
Kia Picanto (JA): Body (Interior and Exterior) / Interior Trim
Components and components location
| Components |
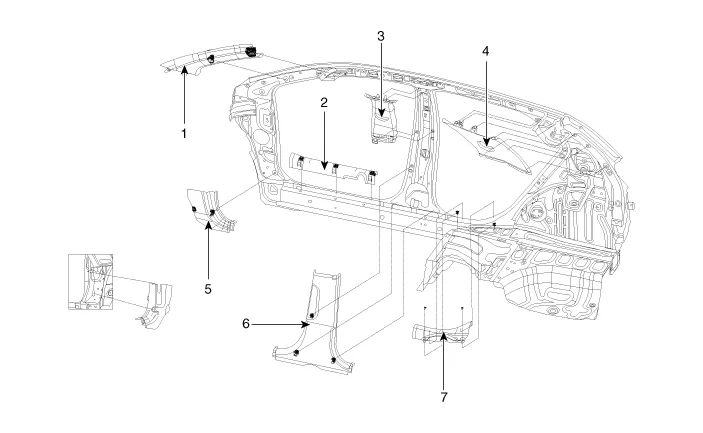
| 1. Front pillar trim assembly 2. Front door scuff trim assembly 3. Center pillar upper trim assembly 4. Rear pillar trim assembly | 5. Cowl side trim assembly 6. Center pillar lower trim assembly 7. Rear door scuff trim assembly |
- Door Scuff Trim
- Cowl Side Trim
- Front Pillar Trim
- Center Pillar Trim
- Rear Transverse Trim
- Luggage Side Trim
- Rear Pillar Trim
Components and components location Component Location 1. Hood lower latch assembly Repair procedures Replacement 1. Disconnect the hood latch connector (A).
Components and components location Component Location 1. Front door scuff trim 2. Rear door scuff trim Repair procedures Replacement Put on gloves to protect your hands.
Other information:
Kia Picanto (JA) 2017-2026 Service & Repair Manual: Lighting System
Specifications Specification Item Type Bulb Watt (W) Front Headlamp Halogen (Position lamp) Low/High H4 LL 55/60 Turn signal lamp PY21WLL 21 Position lamp W5WLL 5 Halogen (Position lamp + DRL) Low/High HB3 (9005HL+) 60 Turn signal lamp LED LED Po
Kia Picanto (JA) 2017-2026 Service & Repair Manual: Rear Glass Defogger Switch
Repair procedures Inspection 1.In the body electrical system, failure can be quickly diagnosed by using the vehicle diagnostic system (KDS/GDS).The diagnostic system (KDS/GDS) provides the following information.(1)Self diagnosis : Checking failure and code number (DTC)(2) Current data : Checking the system input/output data state (3)Actuation
Categories
- Manuals Home
- Kia Picanto Owners Manual
- Kia Picanto Service Manual
- Cooling System
- Brake System
- Engine And Transaxle Assembly
- New on site
- Most important about car
