Kia Picanto (JA): Cooling System / Thermostat

Repair procedures

Removal And Installation
Thermostat
   
Disassembly of the thermostat would have an adverse effect, causing a lowering of cooling efficiency.
1.
Remove the engine room under cover.
(Refer to Engine and Transaxle Assembly - "Engine Room Under Cover")
2.
Drain the coolant.
(Refer to Cooling System - "Coolant")
3.
Disconnect the radiator lower hose (A).

4.
Remove the drive belt.
(Refer to Drive Belt System - "Drive Belt")
5.
Remove the alternator.
(Refer to Engine Electrical System - "Alternator")
6.
Remove the water inlet fitting (A).
Tightening torque :
18.6 - 23.5 N·m (1.9 - 2.4 kgf·m, 13.7 - 17.4 lb·ft)

7.
Remove the thermostat (A).

8.
Install in the reverse order of removal.
   
•
Install the thermostat with the jiggle valve upward.
•
When assembling the thermostat, place the thermostat on the housing with a protrusion of thermostat matching with a groove of the housing and install the inlet fitting. Be careful the thermostat doesn’t get out of the groove on the housing.
•
Clean surface on the rubber packing contact surface.
9.
Fill the engine coolant.
(Refer to Cooling System - "Coolant")
10.
Start the engine and check for leaks.
11.
Recheck the coolant level.
Heater Pipe
1.
Remove the engine room under cover.
(Refer to Engine and Transaxle Assembly - "Engine Room Under Cover")
2.
Drain the coolant.
(Refer to Cooling System - "Coolant")
3.
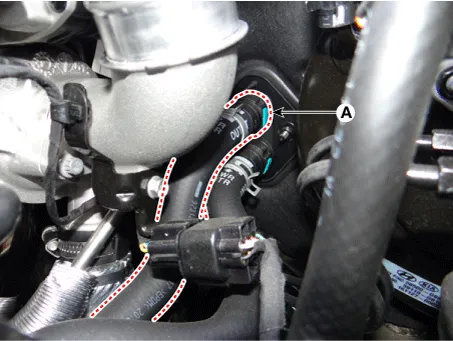
Disconnect the heater hose (A).

4.
Remove the intake manifold.
(Refer to Intake and Exhaust - "Intake Manifold")
5.
Disconnect the water hose.

6.
Remove the alternator.
(Refer to Engine Electrical System -"Alternator")
7.
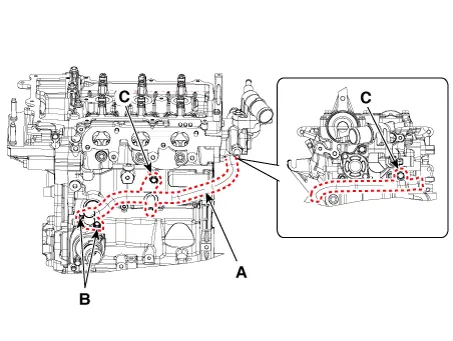
Remove the heater pipe and hose (A).
Tightening torque :
Bolt (B) :
9.8 - 11.8 N·m (1.0 - 1.2 kgf·m, 7.2 - 8.7 lb·ft)
Bolt (C) :
19.6 - 26.5 N·m (2.0 - 2.7 kgf·m, 14.5 - 19.5 lb·ft)

8.
Install in the reverse order of removal.
9.
Fill the engine coolant.
(Refer to Cooling System - "Coolant")
10.
Start the engine and check for leaks.
11.
Recheck the coolant level.
Inspection
1.
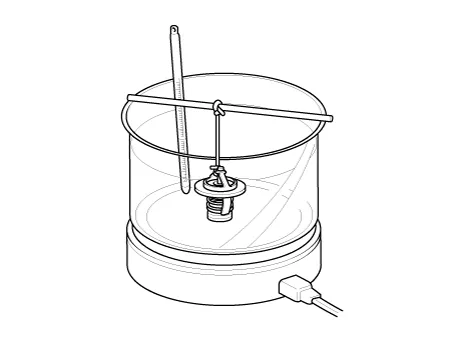
Immerse thermostat in water heated to over 95°C (203°F), then heat for at least 3 minutes to check valve lift.

   
•
Do not use water below 95°C (203°F).
•
Do not directly heat unit as this will damage thermostat.
2.
Check the valve opening temperature.
Valve opening temperature:
86.5 - 89.5°C (187.7 - 193.1°F)
Full opening temperature: 100°C (212°F)
3.
Check the valve lift.
Valve lift : 8 mm (0.3 in) or more at 100°C (212°F)

Troubleshooting

Troubleshooting
Symptoms
Possible Causes
Remedy
Coolant leakage
•
From the thermostat gasket
Check the mounting bolts
•
Check the torque of the mounting bolts
•
Retighten the bolts and check for leakage again.
Check the gasket for damage
•
Check gasket or seal for damage
•
Replace gaskets and reuse the thermostat.
Cooled excessively
•
Low heater performance (cool air blows out)
•
Thermogauge indicates 'LOW'
Visually check after removing the radiator cap.
•
Insufficient coolant or leakage.
•
After refilling coolant, recheck.
Check KDS & start engine
•
Check DTCs
•
Check connection of the fan clutch or the fan motor.
※ If the fan clutch is always connected, there will be a noise at idle.
•
Check the engine coolant sensor, wiring and connectors.
•
Replace the components.
Remove the thermostat and inspect
•
Check for dust or chips in the thermostat valve.
•
Check for sticky thermostat valve.
•
Clean the thermostat valve and reuse the thermostat.
•
Replace the thermostat, if it doesn't work properly.
Heated excessively
•
Engine overheated
•
Thermogauge indicates 'HI'
Visually check after removing the radiator cap.
•
Insufficient coolant or leakage.
※ Be careful when removing the radiator cap from an overheated vehicle.
•
Check air in cooling system.
•
After refilling coolant, recheck.
•
Check the cylinder head gaskets for damage and the tightening torque of the mounting bolts.
Check KDS & start engine
•
Check DTCs
•
Check the fan motor performance as temperature varies.
•
Check if the fan clutch slips.
•
Check for sticky water pump or damaged impeller.
•
Check the engine coolant sensor, wiring and connectors.
•
Check the fan motor, the relay and the connector.
•
Replace the fan clutch, if it doesn't work properly.
•
Replace the water pump, if it doesn't work properly.
Immerse the thermostat in boiling water and inspect.
•
Check that the thermostat opens at the valve opening temperature.
※ ※ Check that the thermostat opens at the valve opening temperature.
•
Replace the thermostat, if it doesn't work properly.

    Repair procedures Removal 1.Disconnect the battery negative terminal. 2.Remove the engine room under cover. (Refer to Engine and Transaxle Assembly - "Engine Room Under Cover") 3.

    Components and components location Components 1. Water jacket insert 2. Water jacket insert inlet 3. Cylinder block 4. O-ring 5. Oil jet 6. Thrust bearing 7.

    Other information:

    Kia Picanto (JA) 2017-2026 Service & Repair Manual: Rear Glass Defogger

    C

    Kia Picanto (JA) 2017-2026 Service & Repair Manual: Parking Assist Sensor

    Components and components location Components Repair procedures Removal 1.Disconnect the negative (-) battery terminal. 2.Remove the rear bumper assembly. (Refer to Body - "Rear Bumper Assembly") 3.Disconnect the connector (A) from the ultrasonic sensor.

    Categories

     
    Copyright © 2026 www.kpicanto.com - 0.0344