Kia Picanto (JA): Interior Trim / Luggage Side Trim
Components and components location
| Component Location |

| 1. Luggage side trim |
Repair procedures
| Replacement |
Put on gloves to protect your hands. |

|

| 1. | Remove the rear seat assembly.
(Refer to Rear Seat - "Rear Seat Assembly")
|
| 2. | Remove the rear door scuff trim by using a remover.
|

| 3. | Remove the luggage board(A).
|

| 4. | Disconnect the tailgate weatherstrip. |
| 5. | Remove the rear transverse trim (A).
|
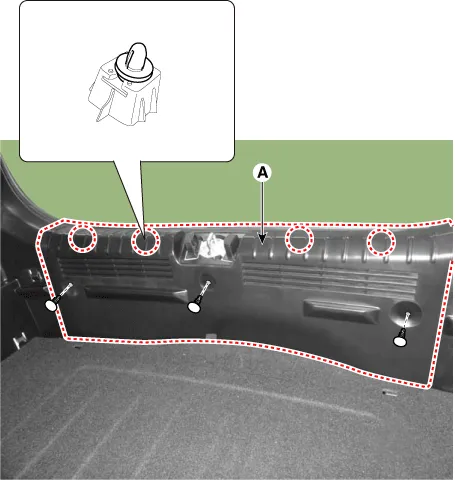
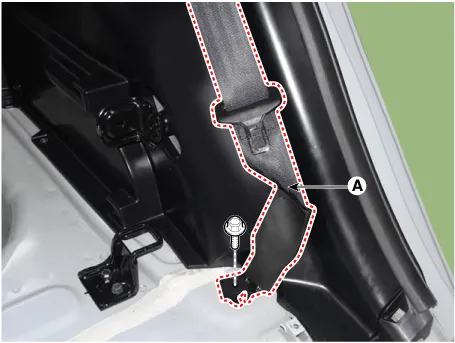
| 6. | Separate the rear seat belt lower anchor (A) after loosening the mounting bolt.
|
| 7. | Remove the folding bracket (A) after loosening the mounting bolts.
|

| 8. | Remove the luggage side trim (A) after loosening the mounting screws.
|

| 9. | Disconnect the luggage lamp connector (A).
|

| 10. | Install in the reverse order of removal.
|
Components and components location Component Location 1. Rear transverse trim Repair procedures Replacement Put on gloves to protect your hands.
Components and components location Component Location 1. Rear pillar trim Repair procedures Replacement Put on gloves to protect your hands.
Other information:
Kia Picanto (JA) 2017-2026 Service & Repair Manual: Power Door Mirror Actuator
Components and components location Components 1. Side repeater lamp Repair procedures Inspection 1. Disconnect the negative (-) battery terminal. 2. Remove the front door quadrant inner cover (A). 3. Disconnect the tweeter speaker connector (A).
Kia Picanto (JA) 2017-2026 Service & Repair Manual: Seat Heater
Components and components location Component Location 1. Seat heater unit 2. Front seat back heater 3. Front seat cushion heater Schematic diagrams Circuit Diagram Repair procedures Inspection 1.Check for continuity and measure the resistance between terminals No 1 and No 4.
Categories
- Manuals Home
- Kia Picanto Owners Manual
- Kia Picanto Service Manual
- Brake System
- Charging System
- To set cruise control speed
- New on site
- Most important about car
