
Kia Picanto (JA): Interior Trim / Cowl Side Trim
Components and components location
| Component Location |

| 1. Cowl side trim |
Repair procedures
| Replacement |
Put on gloves to protect your hands. |

|

| 1. | Remove the front door scuff trim.
(Refer to Interior Trim - "Door Scuff Trim")
|
| 2. | Remove the hood latch release handle (A).
|

| 3. | Carefully remove the front door body side weatherstrip. |
| 4. | Using a remover, remove the cowl side trim (A).
|
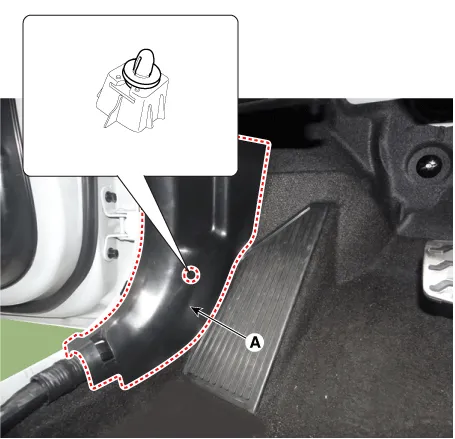
| 5. | Install in the reverse order of removal.
|
Components and components location Component Location 1. Front door scuff trim 2. Rear door scuff trim Repair procedures Replacement Put on gloves to protect your hands.
Components and components location Component Location 1. Front pillar trim Repair procedures Replacement Put on gloves to protect your hands.
Other information:
Kia Picanto (JA) 2017-2026 Service & Repair Manual: Mic
Repair procedures Inspection 1.Disconnect the negative (-) battery terminal. 2.Remove the roof trim assembly. (Refer to Body - "Roof Trim Assembly") 3.Remove the hands free mic (A) after loosening the mounting screws. 4.Check tshe continuity of between terminals.
Kia Picanto (JA) 2017-2026 Service & Repair Manual: Power Mosfet
Repair procedures Inspection 1.Ignition "ON" 2.Manually operate the control switch and measure the voltage of blower motor. 3.Select the control switch to raise voltage until high speed. Fan Motor Voltage ManualFirst speed3.
Categories
- Manuals Home
- Kia Picanto Owners Manual
- Kia Picanto Service Manual
- Timing Chain
- Body Electrical System
- Features of your vehicle
- New on site
- Most important about car
