Kia Picanto (JA): Light bulbs / Map lamp bulb replacement
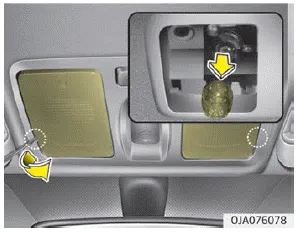
1. Using a flat-blade screwdriver, gently pry the lens cover from lamp housing.
2. Remove the socket from the assembly by turning the socket counterclockwise until the tabs on the socket align with the slots on the assembly.
3. Remove the bulb from bulb-socket by pulling it out.
4. Insert a new bulb by inserting it into the bulb-socket.
5. Install the socket in the assembly by aligning the tabs on the socket with the slots in the assembly. Push the socket into the assembly and turn the socket clockwise.
6. Align the lens cover tabs with the lamp housing notches and snap the lens into place.
1. Using a flat-blade screwdriver, gently pry the lens cover from lamp housing. 2. Remove the socket from the assembly by turning the socket counterclockwise until the tabs on the socket align with the slots on the assembly.
WARNING Prior to working on the Interior lamps, ensure that the “OFF” button is depressed to avoid burning your fingers or receiving an electric shock.
Other information:
Kia Picanto (JA) 2017-2026 Service & Repair Manual: High Mounted Stop Lamp
Repair procedures Removal 1. Disconnect the negative (-) battery terminal. 2. Open the tailgate. 3. Loosen the high mounted stop lamp mounting nuts (A). 4. Disconnect the washer nozzle (A) and high mounted stop lamp connector (B). 5. Remove the high mounted stop lamp (C).
Kia Picanto (JA) 2017-2026 Service & Repair Manual: Smart Key Unit
Components and components location Components Connector Pin Information No. Connector A Connector B Connector C 1 - IGN2 Relay_output Battery (+)_Signal 2 SSB Switch1 signal_input P-CAN (Low) - 3 Driver door o
Categories
- Manuals Home
- Kia Picanto Owners Manual
- Kia Picanto Service Manual
- Engine Oil and Filter
- Engine Mechanical System
- Cylinder Head
- New on site
- Most important about car
