Kia Picanto (JA): Light bulbs / License plate lamp bulb replacement
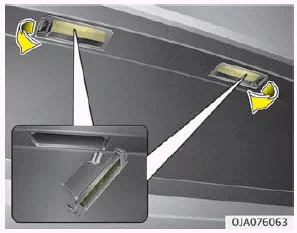
1. Using a flat-blade screwdriver, gently pry the lens cover from lamp housing.
2. Remove the socket from the assembly by turning the socket counterclockwise until the tabs on the socket align with the slots on the assembly.
3. Remove the bulb from bulb-socket by pulling it out.
4. Insert a new bulb by inserting it into the bulb-socket.
5. Install the socket in the assembly by aligning the tabs on the socket with the slots in the assembly. Push the socket into the assembly and turn the socket clockwise. 6. Align the lens cover tabs with the lamp housing notches and snap the lens into place.
If the high mounted stop lamp (1) does not operate, have your vehicle checked by a professional workshop. Kia recommends to visit an authorized Kia dealer/ service partner.
1. Using a flat-blade screwdriver, gently pry the lens cover from lamp housing. 2. Remove the socket from the assembly by turning the socket counterclockwise until the tabs on the socket align with the slots on the assembly.
Other information:
Kia Picanto (JA) 2017-2026 Service & Repair Manual: Indicators And Gauges
Troubleshooting Troubleshooting Error Item Failure symptom Inspection items Detailed inspections Relevant Parts/ Components Screen display LCD scree
Kia Picanto (JA) 2017-2026 Service & Repair Manual: Smart Key System
Specifications Specifications Smart Key Unit Items Specification Rated voltage DC 12 V Operating voltage DC 9 - 16 V Operating temperature -31 - 167°F (-35 - 75°C) Load Max. 4mA (When welcome light function "OFF") RF Receiver Items
Categories
- Manuals Home
- Kia Picanto Owners Manual
- Kia Picanto Service Manual
- To set cruise control speed
- Heating,Ventilation, Air Conditioning
- Coolant
- New on site
- Most important about car
