Kia Picanto (JA): Light bulbs / Stop and tail lamp bulb replacement
1. Open the tailgate.
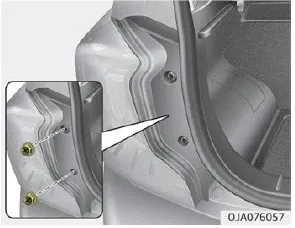
2. Loosen the light assembly retaining screws with a cross-tip screwdriver.
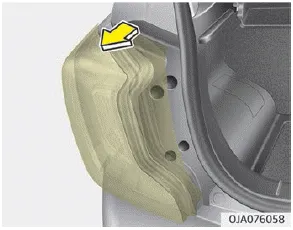
3. Remove the rear combination lamp assembly from the body of the vehicle.
4. Disconnect the rear combination lamp connector.
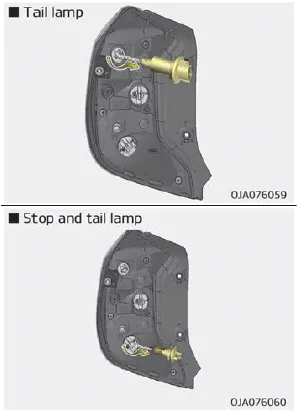
5. Remove the socket from the assembly by turning the socket counterclockwise until the tabs on the socket align with the slots on the assembly.
6. Remove the bulb from the socket by pressing it in and rotating it counterclockwise until the tabs on the bulb align with the slots in the socket. Pull the bulb out of the socket.
7. Insert a new bulb by inserting it into the socket and rotating it until it locks into place.
8. Install the socket in the assembly by aligning the tabs on the socket with the slots in the assembly. Push the socket into the assembly and turn the socket clockwise.
9. Install the rear combination lamp assembly to the body of the vehicle.
1. Remove the lamp assembly from the vehicle by prying the lens and pulling the assembly out. 2. Disconnect the bulb electrical connector. 3. Separate the socket and the lens parts by turning the socket counterclockwise until the tabs on the socket align with the slots on the lens part.
1. Open the tailgate. 2. Loosen the light assembly retaining screws with a cross-tip screwdriver. 3. Remove the rear combination lamp assembly from the body of the vehicle.
Other information:
Kia Picanto (JA) 2017-2026 Service & Repair Manual: Parking Assist Sensor
Components and components location Components Repair procedures Removal 1.Disconnect the negative (-) battery terminal. 2.Remove the rear bumper assembly. (Refer to Body - "Rear Bumper Assembly") 3.Disconnect the connector (A) from the ultrasonic sensor.
Kia Picanto (JA) 2017-2026 Service & Repair Manual: Front Washer Motor
Repair procedures Inspection Front Washer Motor 1.With the washer motor connected to the reservoir tank, fill the reservoir tank with water. • Before filling the reservoir tank with water, check the filter for foreign material or contamination.
Categories
- Manuals Home
- Kia Picanto Owners Manual
- Kia Picanto Service Manual
- To set cruise control speed
- Automatic Transaxle Fluid
- Engine Oil and Filter
- New on site
- Most important about car
