
Kia Picanto (JA): Lubrication System / Oil Pressure Switch
Repair procedures
| Removal and Installation |
| 1. | Remove the engine room under cover.
(Refer to Engine and Transaxle Assembly - "Engine Room Under Cover")
|
| 2. | Remove the oil pressure switch (B) after disconnecting the connector (A).
|
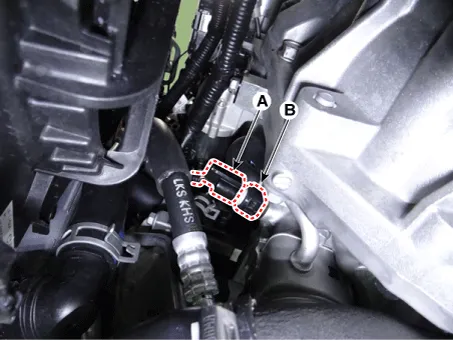
| 3. | Install in the reverse order of removal.
|


| Inspection |
| 1. | Check the continuity between the terminal and the body with an ohmmeter. If there is no continuity, replace the oil pressure switch.
|

| 2. | Check
the continuity between the terminal and the body when the fine wire is
pushed. If there is continuity even when the fine wire is pushed,
replace the switch.
|

| 3. | If
there is no continuity when a 49.0 kPa (0.5 kg/cm², 7.1 psi) is applied
through the oil hole, the switch is operating properly. Check for air leakage. If air leaks, the diaphragm is broken. Replace it. |
Flow diagram Flow Diagram Repair procedures Engine Oil And Filter Replacement • Prolonged and repeated contact with mineral oil will result in the removal of natural fats from the skin, leading to dryness, irritation and dermatitis.
Repair procedures Removal 1.Remove the engine room under cover. (Refer to Engine and Transaxle Assembly - “Engine Room Under Cover”) 2.
Other information:
Kia Picanto (JA) 2017-2026 Service & Repair Manual: Multimedia Jack
Schematic diagrams Circuit Diagram Description and operation Description The multimedia jack on the console upper cover is for customers who like to listen to external portable music players like the MP3 etc., through the vehicle's sound system when it is linked to this jack.
Kia Picanto (JA) 2017-2026 Service & Repair Manual: Evaporator Core
Repair procedures Replacement 1.Disconnect the negative (-) battery terminal. 2.Remove the heater unit. (Refer to Heater - "Heater Unit") 3.Remove the Evaporator temperature sensor. (Refer to Air Conditioning System - "Evaporator Temperature Sensor") 4.
Categories
- Manuals Home
- Kia Picanto Owners Manual
- Kia Picanto Service Manual
- Engine And Transaxle Assembly
- Thermostat
- Engine Control / Fuel System
- New on site
- Most important about car
