Kia Picanto (JA): Front Door / Front Door Trim
Components and components location
| Component Location |

| 1. Front door trim |
Repair procedures
| Replacement |
Put on gloves to protect your hands. |

|

| 1. | Remove the front door quadrant inner cover (A) by using a remover.
|

| 2. | Disconnect the front door tweeter speaker connector (A).
|

| 3. | Remove the front door inside handle cap (A).
|
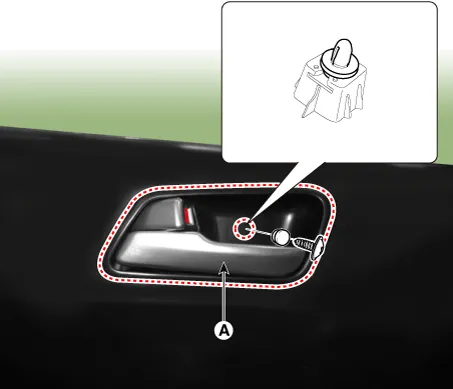
| 4. | Loosen the screw (B) after opening the cap (A).
|

| 5. | Remove the front door trim (A).
|

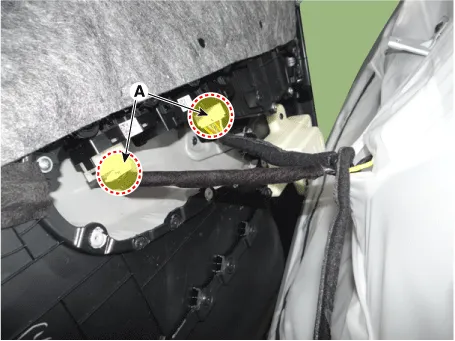
| 6. | Disconnect the power window switch connector (A) and IMS switch connector (B).
|
| 7. | Install in the reverse order of removal.
|
Components and components location Components 1. Front door trim assembly 2. Front door trim mounting bracket 3. Front door panel assembly 4.
Repair procedures Replacement Put on gloves to protect your hands. • Use a plastic panel removal tool to remove interior trim pieces without marring the surface.
Other information:
Kia Picanto (JA) 2017-2026 Service & Repair Manual: Headlamps
Description and operation Description BI-FUNCTION 1. Definition – A headlamp with integrated functions of high and low beam – The light is controlled by rotating the shield inserted to the lens.
Kia Picanto (JA) 2017-2026 Service & Repair Manual: License Lamps
Repair procedures Removal 1. Disconnect the negative (-) battery terminal. 2. Remove the license lamp assembly (A) after pressing the locking pin. 3. Disconnect the license lamp connector (A). 4. Remove the license lamp bulb (B) after removing the license lamp socket (A).
Categories
- Manuals Home
- Kia Picanto Owners Manual
- Kia Picanto Service Manual
- Cylinder Head
- Automatic Transaxle Fluid
- Normal Condition
- New on site
- Most important about car
