Kia Picanto (JA): Safety features of your vehicle / Air bag - supplemental restraint system
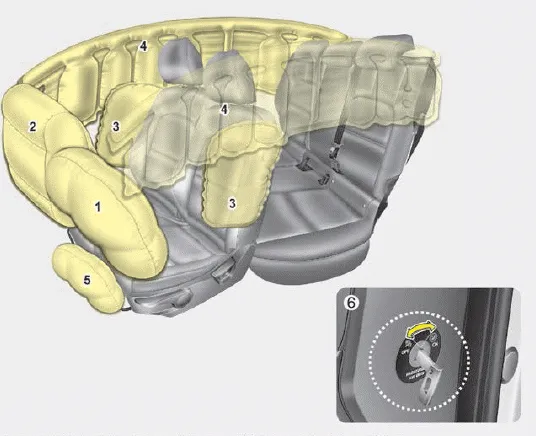
1. Driver’s front air bag*
2. Passenger’s front air bag*
3. Side air bag*
4. Curtain air bag*
5. Driver’s knee air bag*
6. Front passenger’s air bag ON/OFF
switch*
WARNING
- Even in vehicles with air bags, you and your passengers must always wear the safety belts provided in order to minimize the risk and severity of injury in the event of a collision or rollover.
- SRS and pretensioners contain explosive chemicals. If scraping a vehicle without removing SRS and pretensioners from a vehicle, it may cause fire. Before scraping a vehicle, contact a professional workshop. Kia recommends to visit an authorized Kia dealer/service partner.
- Keep the SRS parts and wirings away from water or any liquid. If the SRS components are inoperative due to exposure to water or liquids, it may cause fire or severe injury.
- How does the air bag system operate
- Air bag warning light
- SRS components and functions
- Driver's and passenger's front air bag
- Side air bag
- Curtain air bag
- Why didn’t my air bag go off in a collision? (Inflation and noninflation conditions of the air bag)
- SRS care
- Additional safety precautions
- Air bag warning label
The ISOFIX system holds a Child Restraint System during driving and in an accident. This system is designed to make installation of the Child Restraint System easier and reduce the possibility of improperly installing your Child Restraint System.
Air bags are activated (able to inflate if necessary) only when the ignition switch is turned to the ON or START position. Air bags inflate instantly in the event of a serious frontal collision or side collision (if equipped with a side air bag or curtain air bag) in order to help protect the occupants from serious physical injury.
Other information:
Kia Picanto (JA) 2017-2026 Service & Repair Manual: Emergency Call (eCall) Unit
Components and components location Component The eCall unit for AVN is equipped in AVN head unit. Repair procedures Removal Carry out the Test Mode in the following cases.– Replacing the eCall unit– Replacing the Bac
Kia Picanto (JA) 2017-2026 Service & Repair Manual: Horn
Components and components location Component Location 1. Horn switch 2. Horn relay 3. Horn 4. Clock spring Repair procedures Removal 1.Disconnect the negative (-) battery terminal. 2.Remove the engine room under cover. G 1.
Categories
- Manuals Home
- Kia Picanto Owners Manual
- Kia Picanto Service Manual
- Timing Chain
- Front Disc Brake
- Thermostat
- New on site
- Most important about car
