Kia Picanto (JA): Features of your vehicle / Fuel filler lid
Opening the fuel filler lid
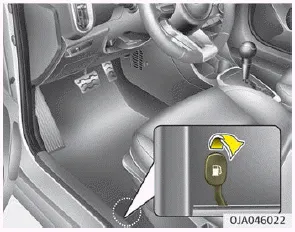
The fuel-filler lid must be opened from inside the vehicle by pulling up on the fuel-filler lid opener located on the front floor area on the driver’s seat.
NOTICE
If the fuel filler lid will not open because ice has formed around it, tap lightly or push on the lid to break the ice and release the lid. Do not pry on the lid. If necessary, spray around the lid with an approved de-icer fluid (do not use radiator anti-freeze) or move the vehicle to a warm place and allow the ice to melt.
1. Stop the engine.
2. To open the fuel filler lid, pull up the fuel filler lid opener.
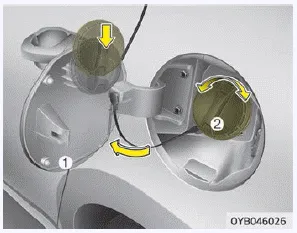
3. Pull the fuel filler lid (1) out to fully open.
4. To remove the cap, turn the fuel tank cap (2) counterclockwise.
5. Refuel as needed.
Closing the fuel filler lid
1. To install the cap, turn it clockwise until it “clicks”. This indicates that the cap is securely tightened.
2. Close the fuel filler lid and push it lightly and make sure that it is securely closed.
Opening the hood 1. Pull the release lever to unlatch the hood. The hood should pop open slightly. WARNING Open the hood after turning off the engine on a flat surface, shifting the shift lever to the P(Park) position for automatic transaxle and to the 1st(First) gear or R(Reverse) for manual transaxle, and setting the parking brake.
If your vehicle is FFV (Flex fuel vehicle), it needs to be checked and the reservoir should be filled in with the gasoline for cold start when the outside temperature is low (below 20°C).
Other information:
Kia Picanto (JA) 2017-2026 Service & Repair Manual: Multimedia Jack
Schematic diagrams Circuit Diagram Description and operation Description The multimedia jack on the console upper cover is for customers who like to listen to external portable music players like the MP3 etc., through the vehicle's sound system when it is linked to this jack.
Kia Picanto (JA) 2017-2026 Service & Repair Manual: Headlamp Leveling Actuator
Components and components location Components Repair procedures Removal 1.Disconnect the negative (-) battery terminal. 2.Remove the headlamp assembly. (Refer to Lighting System - "Headlamps") Installation 1.Install the headlamp assembly.
Categories
- Manuals Home
- Kia Picanto Owners Manual
- Kia Picanto Service Manual
- Brake System
- Normal Condition
- Timing Chain
- New on site
- Most important about car
