Kia Picanto (JA): Light bulbs / Position lamp bulb replacement (Headlamp Type A)
1. Open the hood.
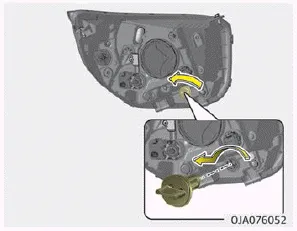
2. Remove the bulb-socket from the headlamp assembly by turning the bulb-socket counterclockwise until the tabs on the bulb-socket align with the slots on the headlamp assembly.
3. Remove the bulb from bulb-socket by pulling it out.
4. Insert a new bulb by inserting it into the bulb-socket.
5. Install the socket in the headlamp assembly by aligning the tabs on the bulb-socket with the slots in the assembly. Push the bulb-socket into the headlamp assembly and turn the socket clockwise.
1. Open the hood. 2. Remove the headlamp bulb cover by turning it counterclockwise. 3. Disconnect the headlamp bulb socket-connector. 4. Unsnap the headlamp bulb retaining wire by pressing the end and pushing it upward.
1. Open the hood. 2. Remove the bulb-socket from the headlamp assembly by turning the bulb-socket counterclockwise until the tabs on the bulb-socket align with the slots on the headlamp assembly.
Other information:
Kia Picanto (JA) 2017-2026 Service & Repair Manual: Headlamp Leveling Switch
Schematic diagrams Circuit Diagram Repair procedures Removal 1.Disconnect the negative (-) battery terminal. 2.Remove the crash pad lower panel. (Refer to Body - "Crash Pad Lower Panel") 3.Remove the crash pad side switch (A) after loosening the mounting screws.
Kia Picanto (JA) 2017-2026 Service & Repair Manual: Map Lamp
Repair procedures Removal • Put on gloves to prevent hand injuries. • When removing with a flat-tip screwdriver or remover, wrap protective tape around the tools to prevent damage to components.
Categories
- Manuals Home
- Kia Picanto Owners Manual
- Kia Picanto Service Manual
- Suspension System
- Cooling System
- Coolant
- New on site
- Most important about car
