Kia Picanto (JA): Engine Control System / Intake Air Temperature Sensor (IATS)
Specifications
▷ Type: Thermistor type
Temperature
|
Resistance (kΩ)
|
°C
|
°F
|
-40
| -40
| 40.93 - 48.35
|
-30
| -22
| 23.43 - 27.34
|
-20
| -4
| 13.89 - 16.03
|
-10
| 14
| 8.5 - 9.7
|
0
| 32
| 5.38 - 6.09
|
10
| 50
| 3.48 - 3.90
|
20
| 68
| 2.31 - 2.57
|
30
| 86
| 1.9 - 2.1
|
40
| 104
| 1.08 - 1.21
|
50
| 122
| 0.76 - 0.85
|
60
| 140
| 0.54 - 0.62
|
70
| 158
| 0.40 - 0.45
|
80
| 176
| 0.29 - 0.34
|
90
| 194
| 0.22 - 0.26
|
100
| 212
| 0.17 - 0.20
|
110
| 230
| 0.13 - 0.15
|
120
| 248
| 0.10 - 0.12
|
130
| 266
| 0.08 - 0.09
|
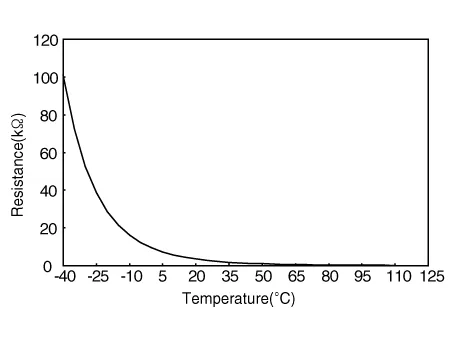
Description and operation
Integrated
in the Manifold Absolute Pressure Sensor, the Intake Air Temperature
Sensor (IATS) detects the intake air temperature.
To
precisely calculate the amount of air, air temperature correction is
needed as air density varies with temperature. So, the ECM uses IATS
signal as well as MAPS signal. It has a Negative Temperature Coefficient
(NTC) Thermistor whose resistance changes in reverse proportion to
temperature.

Schematic diagrams


Repair procedures
| 1. | Turn the ignition switch OFF. |
| 2. | Disconnect the IATS connector. |
| 3. | Measure resistance between the IATS terminals 3 and 4. |
| 4. | Check that the resistance is within the specification.
Temperature
|
Resistance (kΩ)
|
°C
|
°F
| -40
| -40
| 40.93 - 48.35
| -30
| -22
| 23.43 - 27.34
| -20
| -4
| 13.89 - 16.03
| -10
| 14
| 8.5 - 9.7
| 0
| 32
| 5.38 - 6.09
| 10
| 50
| 3.48 - 3.90
| 20
| 68
| 2.31 - 2.57
| 30
| 86
| 1.9 - 2.1
| 40
| 104
| 1.08 - 1.21
| 50
| 122
| 0.76 - 0.85
| 60
| 140
| 0.54 - 0.62
| 70
| 158
| 0.40 - 0.45
| 80
| 176
| 0.29 - 0.34
| 90
| 194
| 0.22 - 0.26
| 100
| 212
| 0.17 - 0.20
| 110
| 230
| 0.13 - 0.15
| 120
| 248
| 0.10 - 0.12
| 130
| 266
| 0.08 - 0.09
|
|
| 1. | Turn the ignition switch OFF and disconnect the battery negative (-) terminal. |
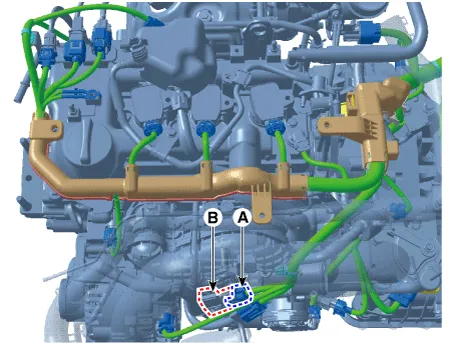
| 2. | Disconnect the manifold absolute pressure sensor connector (A). |
| 3. | Remove the sensor (B) from the Intake manifold by loosening the mounting screws.
Manifold absolute pressure sensor mounting screw :
6.4 - 8.3 N·m (0.65 - 0.85 kgf·m, 4.7 - 6.1 lb·ft) |
 |
| •
| Tighten the component to the specified torques. |
| •
| Note
that internal damage may occur when the component is dropped. If the
component has been dropped, inspect if it is damaged before installing. |
| •
| Carefully insert the sensor into the installation hole without damaging it. |
|
| 1. | Install in the reverse order of removal. |
Specifications
Specification
Pressure
[kPa (kgf/cm², psi)]
Output Voltage (V) [Vref=5V]
32.
Specifications
Specification
Temperature[⁰C(⁰F)]
Resistance(kΩ)
-40(-40) 811.
Other information:
Repair procedures
Replacement
1.Disconnect the negative (-) battery terminal.
2.Remove the heater unit.
(Refer to Heater - "Heater Unit")
3.Remove the Evaporator temperature sensor.
(Refer to Air Conditioning System - "Evaporator Temperature Sensor")
4.
Description and operation
Description
This
has particle filter which eliminates foreign materials and odor. The
particle filter includes odor filter as well as conventional dust filter
to ensure comfortable interior environment.
Repair procedures
Replacement
1.


