Kia Picanto: AVN System / AVN(Audio Video Navigation) head unit
Kia Picanto JA 2017-2025 Service & Repair Manual / Body Electrical System / AVN System / AVN(Audio Video Navigation) head unit
Components and components location
| Components |
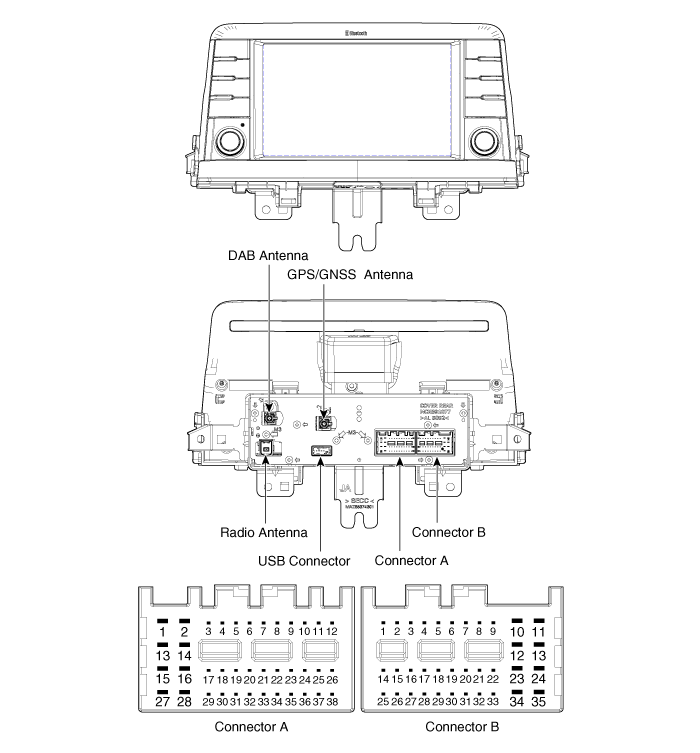
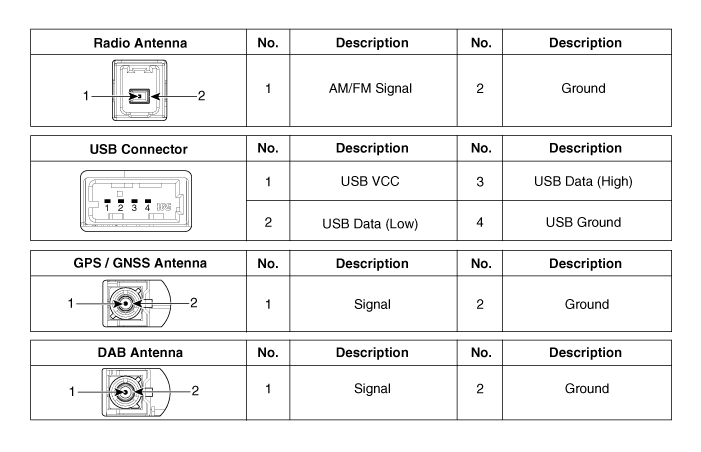
Connector Pin Information
|
No.
|
Connector A
|
Connector B
|
| 1 | Rear door left speaker (+) | - |
| 2 | Rear door left speaker (-) | MIC (+) |
| 3 | - | - |
| 4 | - | - |
| 5 | - | Antenna power |
| 6 | Camera power | Illumination (+) |
| 7 | Camera video | Non E-Call type : - E-Call type : Multmedia-CAN (High) |
| 8 | - | - |
| 9 | - | ALT Left_output (-) |
| 10 | AUX Audio_right input | Battery (+) |
| 11 | AUX Detect | Battery (+) |
| 12 | Steering wheel remote controller | Ground |
| 13 | Front door left speaker (+) | Ground |
| 14 | Front door left speaker (-) | - |
| 15 | Front door right speaker (-) | MIC (-) |
| 16 | Front door right speaker (+) | - |
| 17 | - | - |
| 18 | - | - |
| 19 | - | Default : Ground Option : Illumination (-) |
| 20 | Camera power_Ground | Non E-Call type : - E-Call type : Multmedia-CAN (Low) |
| 21 | Camera video_Ground | - |
| 22 | - | ACC |
| 23 | - | - |
| 24 | AUX Audio_left input | - |
| 25 | AUX Audio_Ground | Reverse |
| 26 | Steering wheel remote controller (Ground) | Door open |
| 27 | Rear door right speaker (-) | Door unlock status |
| 28 | Rear door right speaker (+) | Parking brake |
| 29 | - | 'P' Position |
| 30 | - | Auto light |
| 31 | - | - |
| 32 | - | - |
| 33 | Camera shield_Ground | IGN1 |
| 34 | - | - |
| 35 | - | - |
| 36 | - | |
| 37 | - | |
| 38 | Vehicle speed |
Repair procedures
| Removal |
|

| 1. | Disconnect the negative (-) battery terminal. |
| 2. | Remove the center fascia panel.
(Refer to Body - "Center Fascia Panel")
|
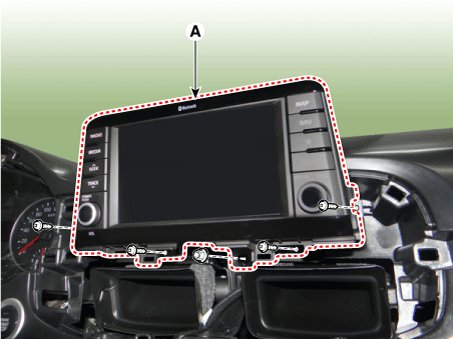
| 3. | Remove the AVN head unit (A) after loosening the mounting screws and nut.
|
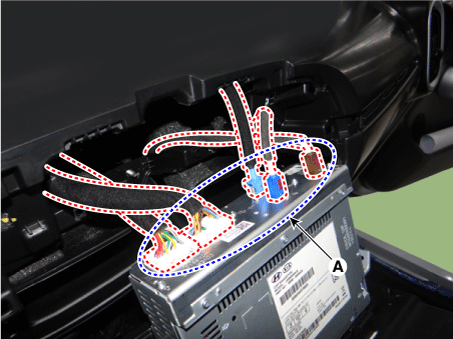
| 4. | Remove the AVN head unit after disconnecting the connectors and antenna cable (A).
|
| Installation |
| 1. | Install the AVN head unit after connecting the AVN head unit connectors and cable. |
| 2. | Install the center fascia panel. |
| 3. | Connect the negative (-) battery terminal. |
|

 AVN System
Components and components location
Component Location
1 . AVN head unit 2. Roof antenna (Radio+GPS/GNSS+DAB+GSM) 3. Multimedia jack 4 . Steering wheel remote control (SWRC) 5 . Hands-free m ...
 Speaker
Repair procedures
Inspection
Troubleshooting of the speakers
When handling the speakers :•
Do not cause shock to the speakers by dropping ...
Other information:
Kia Picanto JA 2017-2025 Service & Repair Manual: High Pressure Fuel Pump
Specifications Specification Items Specification High Pressure Fuel Line bar 20 - 200 MPa 2 - 20 kgf/cm² 20.4 - 203.9 psi 290.1 - 2900.8 Repair procedures Removal 1.Release the residual pressure in fuel li ...
Kia Picanto JA 2017-2025 Service & Repair Manual: Rear Shock Absorber
Components and components location Components 1. Cover 2. Lock nut 3. Retainer 4. Upper bushing 5. Collar 6. Lower bushing 7. Upper cover 8. Bumper stopper 9. Dust cover 10. Shock absorber assembly 11. Washer 12. Bolt Repair procedures Replacement 1. Remove the wheel tire ( ...
Copyright © www.kpicanto.com 2017-2025
