Kia Picanto (JA): If you have a flat tire (with tire mobility kit) (Type B) / Introduction
With the Tire Mobility Kit (TMK) you stay mobile even after experiencing a tire puncture.
The system of compressor and sealing compound effectively and comfortably seals most punctures in a passenger car tire caused by nails or similar objects and reinflates the tire.
After you ensured that the tire is properly sealed you can drive cautiously on the tire (up to 200 km (120 miles)) at a max. speed of 80 km/h (50 mph) in order to reach a vehicle or tire dealer to have the tire replaced.
It is possible that some tires, especially with larger punctures or damage to the sidewall, cannot be sealed completely. Air pressure loss in the tire may adversely affect tire performance.
For this reason, you should avoid abrupt steering or other driving maneuvers, especially if the vehicle is heavily loaded or if a trailer is in use. The TMK is not designed or intended as a permanent tire repair method and is to be used for one tire only.
This instruction shows you step by step how to temporarily seal the puncture simply and reliably.
Read the section “Notes on the safe use of the Tire mobility Kit” on page 7-33.
WARNING
Do not use the TMK if a tire is severely damaged by driving run flat or with insufficient air pressure. Only punctured areas located within the tread region of the tire can be sealed using the TMK.
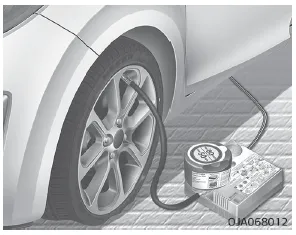
Please read the instructions before using the Tire Mobility Kit. 1. Compressor 2. Sealant bottle The Tire Mobility Kit is a temporary fix to the tire and have the tire inspected by a professional workshop as soon as possible.
1. Speed restriction label 2. Sealant bottle and label with speed restriction 3. Filling hose from sealant bottle to wheel 4. Connectors and cable for the power outlet direct connection 5.
Other information:
Kia Picanto (JA) 2017-2026 Service & Repair Manual: Power Door Lock Switch
Repair procedures Inspection 1.Check for continuity between the terminals. If there is an abnormality, replace the switch. Removal • When removing with a flat-tip screwdriver or remover, wrap protective tape around the tools to prevent damage to components.
Kia Picanto (JA) 2017-2026 Service & Repair Manual: Windshield Wiper/Washer
Components and components location Component Location 1. Windshield wiper arm & blade 2. Wiper & washer switch 3. Windshield washer hose & nozzle 4. Wiper motor & linkage assembly 5. Washer motor 6. Washer reservoir tank 7. Wiper/Washer relay 8.
Categories
- Manuals Home
- Kia Picanto Owners Manual
- Kia Picanto Service Manual
- To set cruise control speed
- Suspension System
- Normal Condition
- New on site
- Most important about car
