Kia Picanto: Light bulbs / Rear turn signal lamp bulb replacement
1. Open the tailgate.
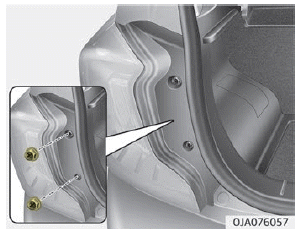
2. Loosen the light assembly retaining screws with a cross-tip screwdriver.
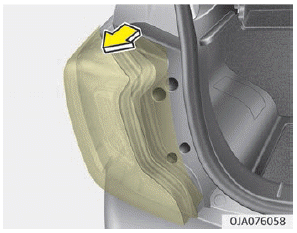
3. Remove the rear combination lamp assembly from the body of the vehicle.
4. Disconnect the rear combination lamp connector.
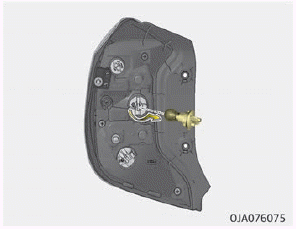
5. Remove the socket from the assembly by turning the socket counterclockwise until the tabs on the socket align with the slots on the assembly.
6. Remove the bulb from the socket by pressing it in and rotating it counterclockwise until the tabs on the bulb align with the slots in the socket. Pull the bulb out of the socket.
7. Insert a new bulb by inserting it into the socket and rotating it until it locks into place.
8. Install the socket in the assembly by aligning the tabs on the socket with the slots in the assembly. Push the socket into the assembly and turn the socket clockwise.
9. Install the rear combination lamp assembly to the body of the vehicle.
 Stop and tail lamp bulb
replacement
Stop and tail lamp bulb
replacement
1. Open the tailgate.
2. Loosen the light assembly retaining
screws with a cross-tip screwdriver.
3. Remove the rear combination lamp
assembly from the body of the vehicle.
4. Disconnect th ...
 Stop and tail lamp (LED type)
bulb replacement
Stop and tail lamp (LED type)
bulb replacement
If the stop and tail lamp (LED) (1) does
not operate, have your vehicle checked
by a professional workshop. Kia recommends
to visit an authorized Kia dealer/
service partner. ...
Other information:
Kia Picanto JA 2017-2025 Owner's Manual: SRS components and functions
The SRS consists of the following components: 1. Driver's front air bag module 2. Passenger's front air bag module 3. Side air bag modules 4. Curtain air bag modules 5. Retractor pre-tensioner assemblies 6. Air bag warning light 7. SRS control module (SRSCM) / Rollover sensor 8. S ...
Kia Picanto JA 2017-2025 Service & Repair Manual: Map Lamp
Repair procedures Removal • Put on gloves to prevent hand injuries. • When removing with a flat-tip screwdriver or remover, wrap protective tape around the tools to prevent damage to components. 1. Disconnect ...
