Kia Picanto (JA): If you have a flat tire (with tire mobility kit) (Type A) / Components of the Tire Mobility Kit (TMK)
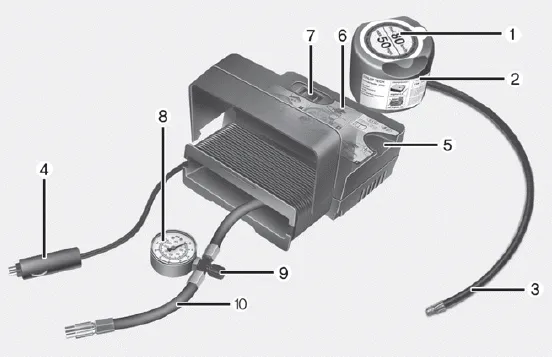
1. Speed restriction label
2. Sealant bottle and label with speed
restriction
3. Filling hose from sealant bottle to
wheel
4. Connectors and cable for the power
outlet direct connection
5. Holder for the sealant bottle
6. Compressor
7. On/off switch
8. Pressure gauge for displaying the
tire inflation pressure
9. Screw cap for reducing tire inflation
pressure
10. Hose to connect compressor and
sealant bottle or compressor and
wheel
Connectors, cable and connection hose are stored in the compressor housing.
WARNING
Before using the Tire Mobility Kit, follow the instructions on the sealant bottle.
Remove the label with the speed restriction from the sealant bottle and apply it to the steering wheel. Please note the expiry date on the sealant bottle.
With the Tire Mobility Kit (TMK) you stay mobile even after experiencing a tire puncture. The system of compressor and sealing compound effectively and comfortably seals most punctures in a passenger car tire caused by nails or similar objects and reinflates the tire.
1. Detach the speed restriction label (1) from the sealant bottle (2), and place it in a highly visible place inside the vehicle such as on the steering wheel to remind the driver not to drive too fast.
Other information:
Kia Picanto (JA) 2017-2026 Service & Repair Manual: Body Control Module (BCM)
Specifications Specifications [BCM Type] Items Specifications Rated voltage DC 12 V Operating voltage DC 9 - 16 V Operating temperature -31 - 167°F (-35 - 75°C) Dark current SMK : 3mA / Keyless : 3.
Kia Picanto (JA) 2017-2026 Service & Repair Manual: Smart Key System
Specifications Specifications Smart Key Unit Items Specification Rated voltage DC 12 V Operating voltage DC 9 - 16 V Operating temperature -31 - 167°F (-35 - 75°C) Load Max. 4mA (When welcome light function "OFF") RF Receiver Items
Categories
- Manuals Home
- Kia Picanto Owners Manual
- Kia Picanto Service Manual
- Thermostat
- Engine Control / Fuel System
- Normal Condition
- New on site
- Most important about car
