Kia Picanto: Body Electrical System / Indicators And Gauges
Kia Picanto JA 2017-2025 Service & Repair Manual / Body Electrical System / Indicators And Gauges
Troubleshooting
| Troubleshooting |
|
Error Item
|
Failure symptom
|
Inspection items
|
Detailed inspections
|
Relevant Parts/
Components | ||||||||||||
| Screen display | LCD screen does not turn on |
|
| Connectors, wiring, fuses, dashboard | ||||||||||||
| Warning light | Airbag warning lamp malfunction |
|
| ACU Connectors, wiring, fuses, dashboard | ||||||||||||
| Mode conversion | Integrated driving mode malfunction |
|
| Switch connector, wiring dashboard | ||||||||||||
| Illumination | Interior light brightness cannot be controlled. |
|
| Switch connector, wiring dashboard | ||||||||||||
| Warning Sound | No dashboard alarm |
|
| Speaker connectors, wiring dashboard | ||||||||||||
| Fuel indicator | Faulty fuel gauge indication |
|
| Fuel sender connector, wiring dashboard |
Components and components location
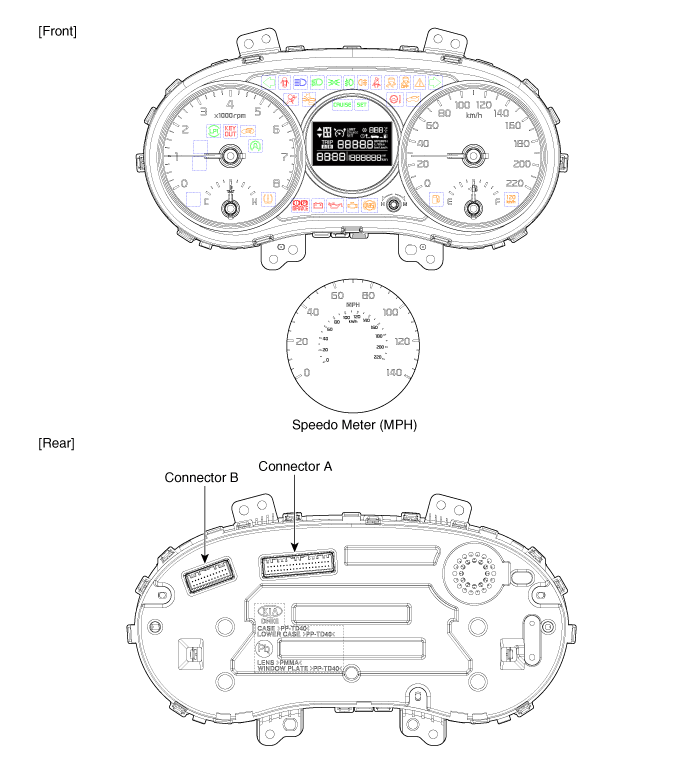
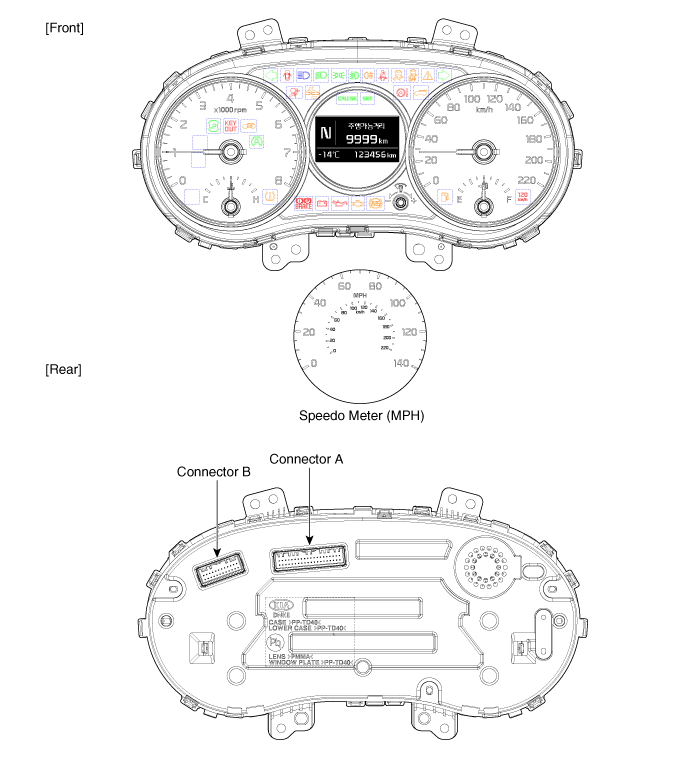
| Components |
| [Standard Type ("2.6 Inch")] |
| [Supervision Type ("2.6 Inch")] |
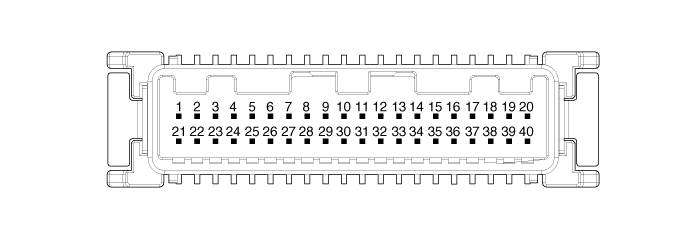
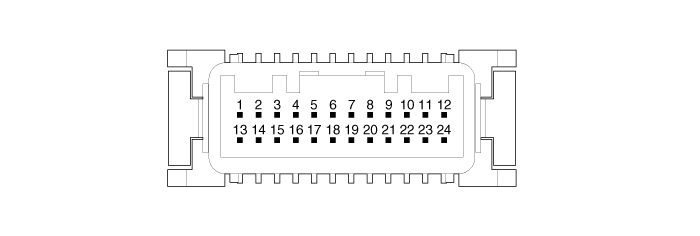
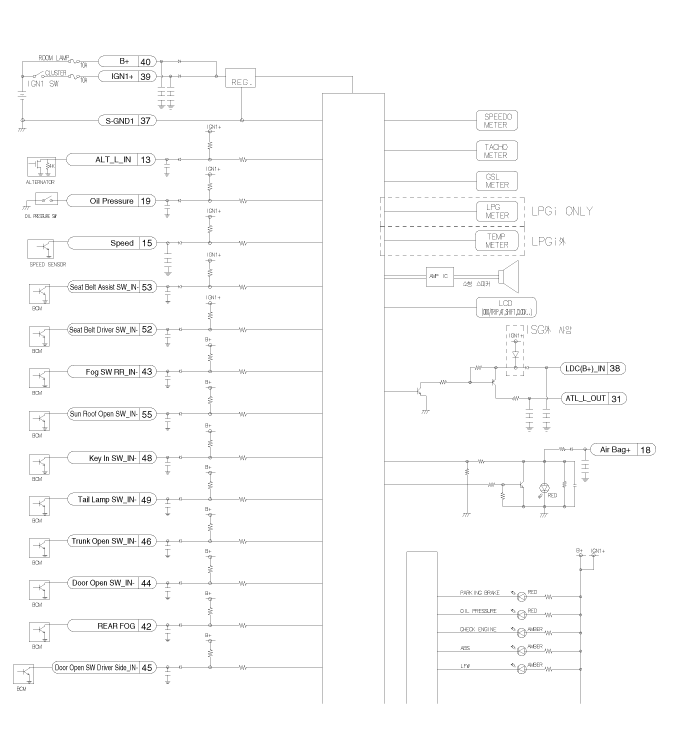
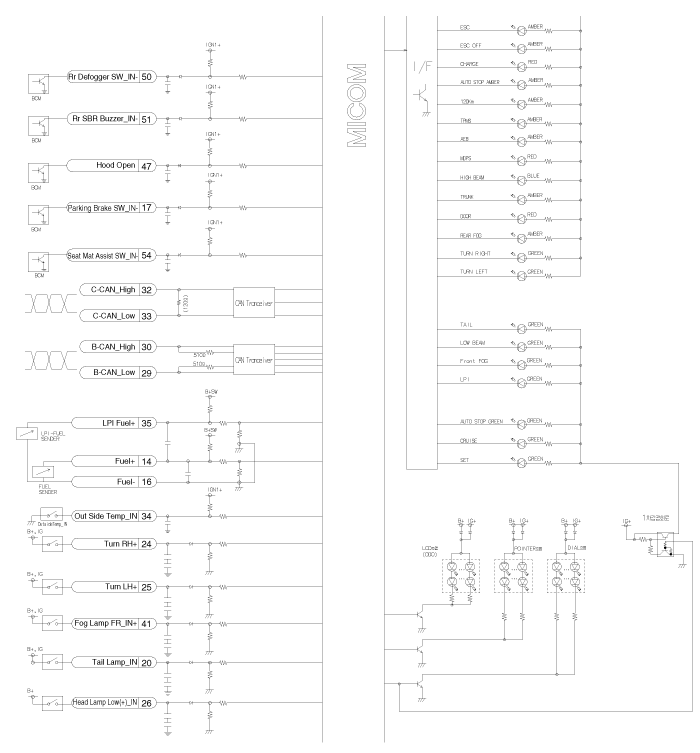
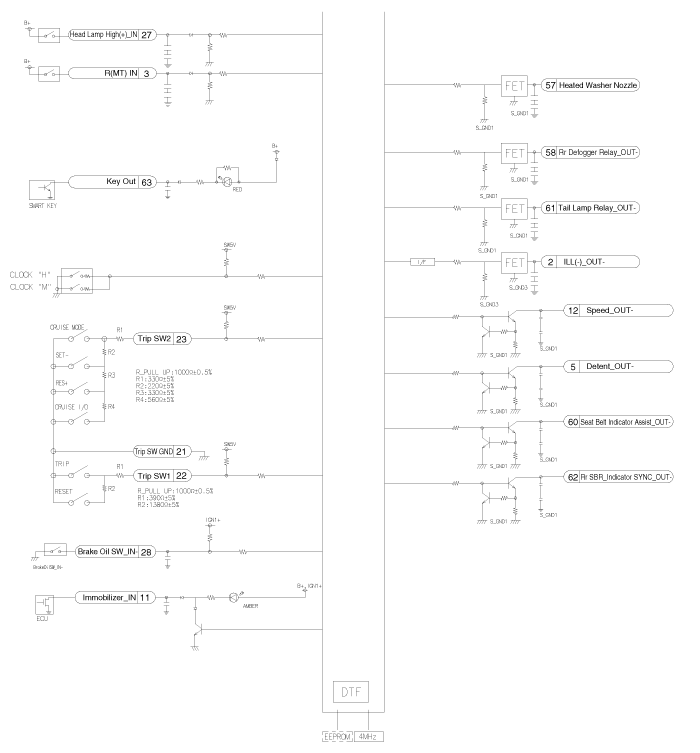
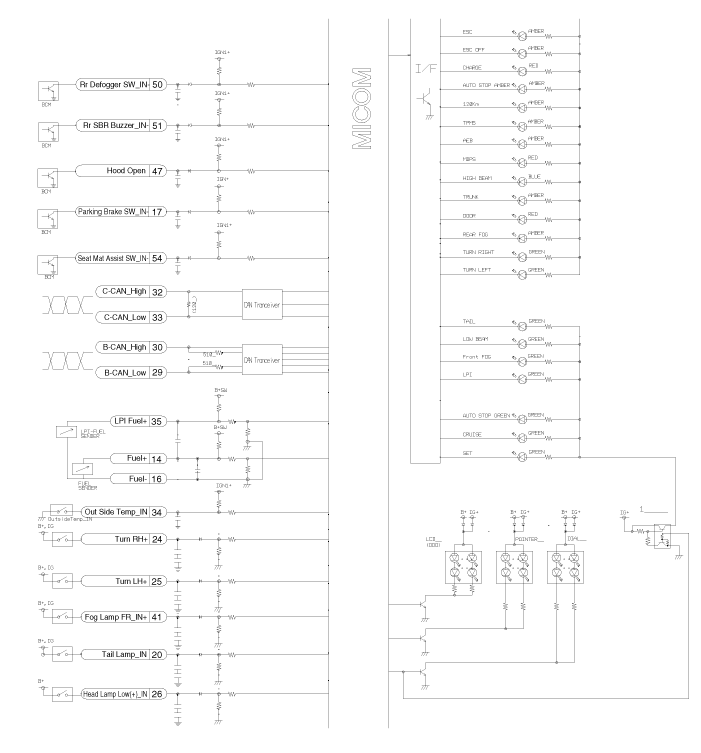
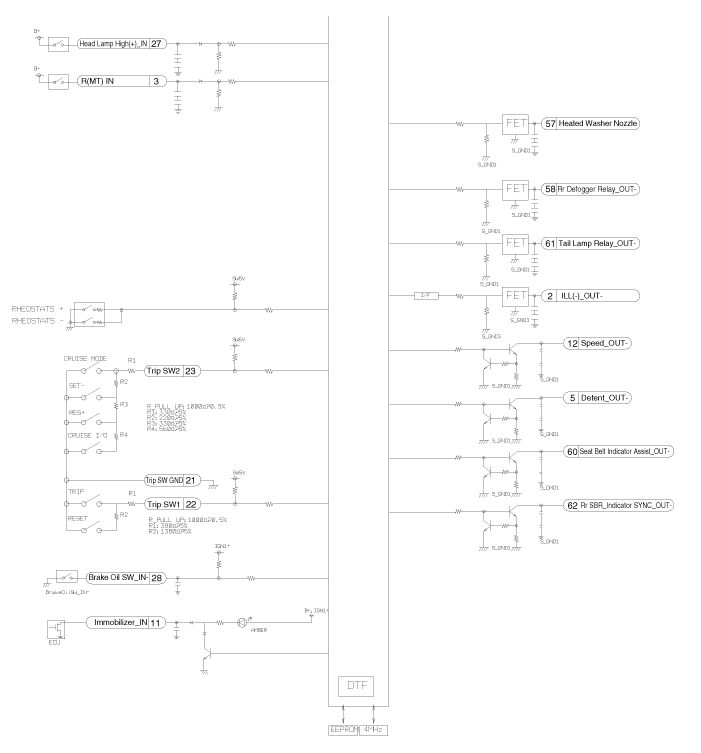
Connector Pin Information
|
Connector A
|
|
|
No.
|
Description
|
No.
|
Description
|
| 1 | Ground | 21 | Trip switch (-) |
| 2 | Illumination (-) | 22 | Trip switch 1 (+) |
| 3 | M/T ('R' Position) | 23 | Trip switch 2 (+) |
| 4 | - | 24 | Turn signal lamp (Right)_Input |
| 5 | Dentent | 25 | Turn signal lamp (Left)_Input |
| 6 | - | 26 | Headlamp low (+)_Input |
| 7 | - | 27 | Headlamp high (+)_Input |
| 8 | - | 28 | Brake oil switch_input |
| 9 | - | 29 | Body-CAN (Low) |
| 10 | - | 30 | Body-CAN (High) |
| 11 | Immobilizer_Input | 31 | Alternator_Output |
| 12 | Vehicle speed_Output | 32 | Chassis-CAN (High) |
| 13 | Alternator_Input | 33 | Chassis-CAN (Low) |
| 14 | Fuel sender (+)_Input | 34 | Outside temp_Input |
| 15 | Vehicle speed_Input | 35 | FFV 5V (+)_Output LPI Fuel_Input |
| 16 | Fuel sender (-)_Input | 36 | - |
| 17 | Parking brake switch_Input | 37 | Ground |
| 18 | Air bag (+)_Input | 38 | LDC Battery (+)_Input |
| 19 | Oil press switch_Input | 39 | IGN1 |
| 20 | Tail lamp_Input | 40 | Battery (+) |
|
Connector B
|
|
|
No.
|
Description
|
No.
|
Description
|
| 1 | Front fog lamp (+)_Input | 13 | Assist seat belt switch (-)_Input |
| 2 | Rear fog lamp (+)_Input | 14 | Assist seat mat switch (-)_Input |
| 3 | Rear fog switch (-)_Input | 15 | Sunroof open switch (-)_Inpu |
| 4 | Door open switch (-)_Input | 16 | Ground |
| 5 | Driver side door open switch (-)_Input | 17 | - |
| 6 | Trunk open switch (-)_Input | 18 | Rear defogger relay (-)_Output |
| 7 | Hood open switch (-)_Input | 19 | Front deicer relay (-)_Output |
| 8 | Key in switch (-)_Input | 20 | Assist seat belt indicator (-)_Output |
| 9 | Tail lamp switch (-)_Input | 21 | Tail lamp relay (-)_Output |
| 10 | Rear defogger switch (-)_Input | 22 | Rear SBR Indicator SYNC(-)_Output |
| 11 | Rear SBR buzzer (-)_Input | 23 | Key out_Input |
| 12 | Driver seat belt switch (-)_Input | 24 | - |
Schematic diagrams
| Circuit Diagram |
| [General Standard] |
| [General Supervision] |
Description and operation
| Description |
Communication Network Diagram
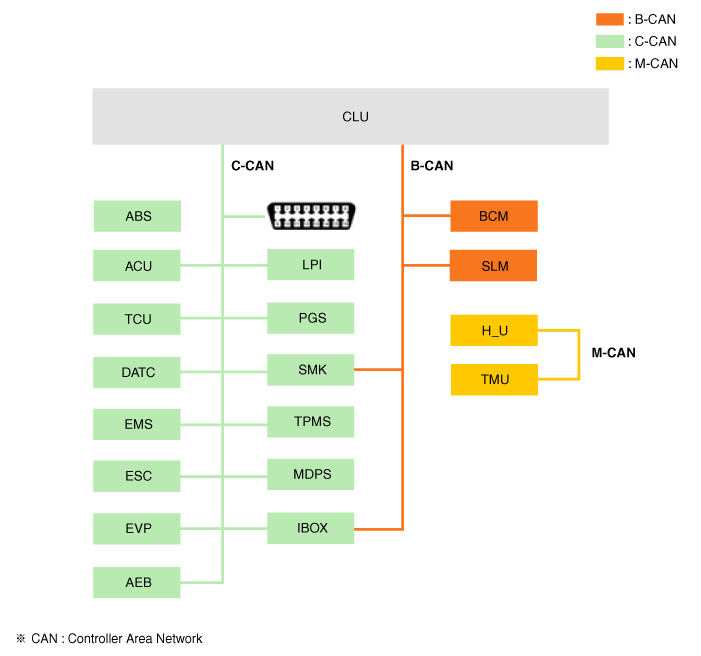
|
Abbreviation
|
Explanation
|
| ABS | Anti-lock Brake System |
| ACU | Airbag Control Unit |
| AEB | Autonomous Emergency Braking |
| B-CAN | Body Controller Area Network |
| BCM | Body Control Module |
| C-CAN | Chassis Controller Area Network |
| CLU | Cluster Module |
| DATC | Dual Automatic Temp Control |
| EMS | Engine Management System |
| ESC | Electronic Control Suspention |
| EVP | Eva Vacuum Pump |
| I-BOX | Telematics System |
| LPI | Liquid Petroleum Injection |
| H_U | Head Unit (Audio / AVN) |
| M-CAN | Multi media Controller Area Network |
| MDPS | Motor Driven Power Steering |
| PGS | Parking Guide System |
| SLM | Seat belt remind & Lighting Module |
| SMK | Smart Key Unit |
| TCU | Transmission Control Unit |
| TMU | Telematics System |
| TPMS | Tire Pressure Monitoring System |
Cluster Variant Coding
As
we have more options (ESC, MDPS etc.) in the car, the dashboard now has
more information to display depending on the chosen options.
For this reason, we need to learn which options the vehicle has when replacing the dashboard.
To
address this issue, a course of learning based on the option required
for the vehicle when replacing the dashboard should be carried out.
This is called Variant Coding.
Repair procedures
| Removal |
|

| 1. | Disconnect the negative (-) battery terminal. |
| 2. | Remove the cluster fascia panel.
(Refer to Body - "Cluster Fascia Panel")
|
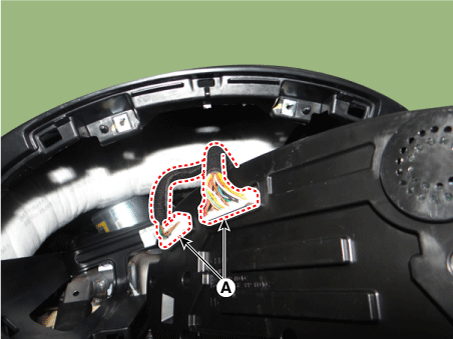
| 3. | Separate the instrument cluster (A) after loosening the mounting screws.
|
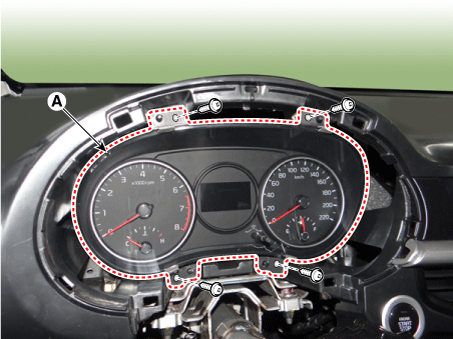
| 4. | Remover the instrument cluster after disconnecting the cluster connectors (A).
|
| Installation |
| 1. | Install the cluster after connect the cluster connectors. |
| 2. | Install the cluster fascia panel. |
| 3. | Connect the negative (-) battery terminal.
|

| Inspection |
| 1. | Check point (Warning indicator)
|


| 2. | Check point (Gauge)
|
Diagnosis with KDS/GDS
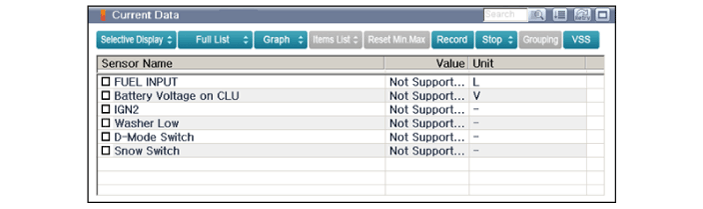
| 1. | In the body electrical system, failure can be quickly diagnosed by using the vehicle diagnostic system (KDS/GDS). The diagnostic system (KDS/GDS) provides the following information.
|
| 2. | Select the 'Car model' and the 'Cluster Module (CLU)' to be checked in order to check the vehicle with the tester |
| 3. | Select the 'Current Data' menu to search the current state of the input/output data.
|
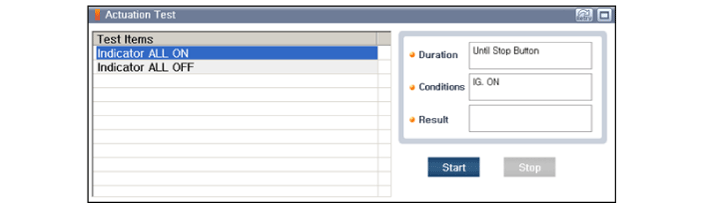
| 4. | To forcibly actuate the input value of the module to be checked, select option 'Actuation Test'
|
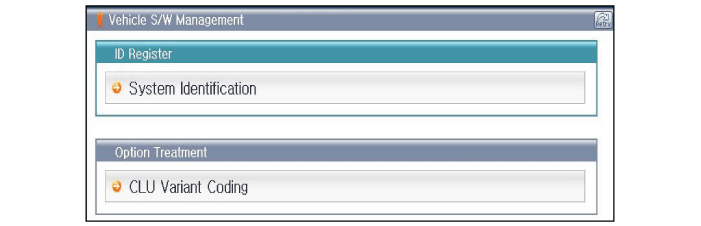
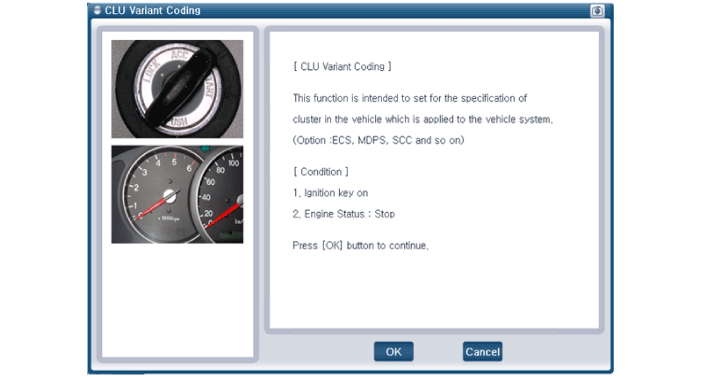
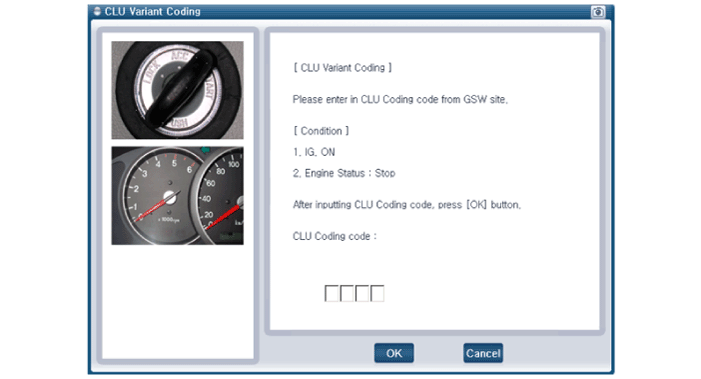
CLU Variant Coding
After replacing the cluster with a new one, must be performed the “Variant Coding” procedure.
| 1. | Connect the cable of KDS/GDS to the data link connector in driver side crash pad lower panel, turn the power on KDS/GDS. |
| 2. | Select model and "BCM". |
| 3. | Select Variant coding mode to perform.
|
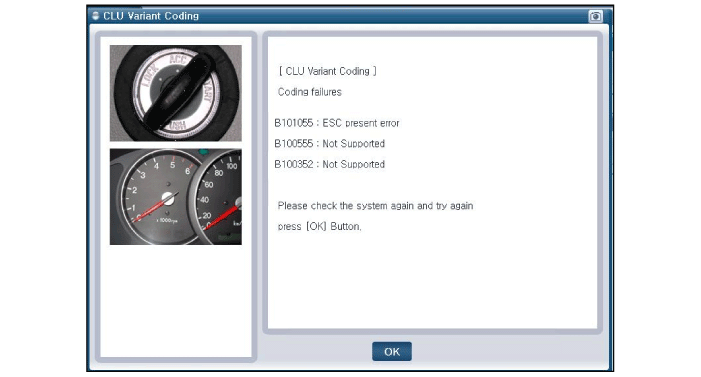
| 4. | If
the trouble codes occurred when performing variant coding, try the CLU
variant coding again after checking the installation status of CLU
system.
|
 Antenna Coil
Repair procedures
Removal
1.Disconnect the negative (-) battery terminal.
2.Remove the crash pad lower panel.
(Refer to Body - "Crash Pad Lower Panel")
3.Remove the steering ...
 Keyless Entry And Burglar Alarm
Specifications
Specification
Item
Specification
Power source 3 V Operating temperature -22 - 167°F (-30 - 75°C) RF Modulation ...
Other information:
Kia Picanto JA 2017-2025 Service & Repair Manual: Front Seat Frame Assembly
Components and components location Component Location 1. Front seat back frame assembly 2. Front seat cushion frame assembly Repair procedures Replacement • Put on gloves to protect your hands. • ...
Kia Picanto JA 2017-2025 Service & Repair Manual: Rear Suspension System
Components and components location Components [Disc type] 1. Torsion beam 2. Brake disc 3. Brake caliper [Drum type] 1. Torsion beam axle 2. Drum brake 3. Parking brake cable ...
Copyright © www.kpicanto.com 2017-2025
