Kia Picanto: Engine Control System / Engine Control Module (ECM)
Kia Picanto JA 2017-2025 Service & Repair Manual / Engine Control / Fuel System / Engine Control System / Engine Control Module (ECM)
Schematic diagrams
| ECM Terminal and Input/Output signal [M/T] |
1. Harness Connector

2. Terminal Function [M/T]
[Connector A]
|
Pin No
|
Description
|
| 1 | Ignition coil (Cylinder #3) control output |
| 2 | Ignition coil (Cylinder #2) control output |
| 3 | - |
| 4 | Electric Waste Gate Actuator (EWGA) Motor [+] control output |
| 5 | Injector (Cylinder #3) [Low] control output |
| 6 | - |
| 7 | Engine Coolant Temperature Sensor (ECTS) signal input |
| 8 | - |
| 9 | Boost Pressure Sensor (BPS) signal input |
| 10 | - |
| 11 | - |
| 12 | Electric Waste Gate Actuator (EWGA) Feed beck signal input |
| 13 | Throttle Position Sensor (TPS) 1 signal input |
| 14 | Accelerator Position Sensor (APS) 1 signal input |
| 15 | Brake Booster Vacuum Pressure Sensor (BBVPS) signal input |
| 16 | - |
| 17 | Ignition coil (Cylinder #1) control output |
| 18 | ETC motor [+] control output |
| 19 | Electric Waste Gate Actuator (EWGA) DC Motor [-] control output |
| 20 | Injector (Cylinder #2) [Low] control output |
| 21 | Wiper switch signal input |
| 22 | Neutral Switch signal input |
| 23 | - |
| 24 | Camshaft Position Sensor (CMPS) [Bank 1/Exhaust] signal input |
| 25 | A/C dual pressure switch signal input |
| 26 | Vehicle speed signal input |
| 27 | Start signal input |
| 28 | Brake Test switch signal input |
| 29 | Brake Light switch signal input |
| 30 | Clutch switch signal input |
| 31 | Injector (Cylinder #2) [High] control output |
| 32 | Injector (Cylinder #3) [High] control output |
| 33 | - |
| 34 | Injector (Cylinder #1) [Low] control output |
| 35 | Fuel Pressure Control Valve (FPCV) [High] control output |
| 36 | Camshaft position sensor (CMPS) [Bank 1/Intake] ground |
| 37 | Camshaft position sensor (CMPS) [Bank 1/Exhaust] ground |
| 38 | - |
| 39 | - |
| 40 | - |
| 41 | Heated Oxygen Sensor (HO2S) [Bank 1/Sensor 2] signal input |
| 42 | - |
| 43 | Battery Sensor Temperature signal input |
| 44 | ISG OFF switch signal input |
| 45 | Electric load signal input [Defrost] |
| 46 | - |
| 47 | Injector (Cylinder #1) [High] control output |
| 48 | ETC motor [-] control output |
| 49 | - |
| 50 | Fuel Pressure Control Valve (FPCV) [Low] control output |
| 51 | Wheel speed sensor [A] signal input |
| 52 | Wheel speed sensor [B] signal input |
| 53 | Crankshaft Position Sensor (CKPS) ground |
| 54 | Crankshaft Position Sensor (CKPS) signal input |
| 55 | - |
| 56 | Camshaft Position Sensor (CMPS) [Bank 1/Intake] signal input |
| 57 | Heated Oxygen Sensor (HO2S) [Bank 1/Sensor 2] ground |
| 58 | - |
| 59 | Battery Sensor Current Direct signal input |
| 60 | - |
[Connector B]
|
Pin No
|
Description
|
| 1 | ECM ground |
| 2 | ECM ground |
| 3 | ECM ground |
| 4 | Battery power (B+) |
| 5 | Battery power (B+) |
| 6 | Battery power (B+) |
| 7 | Battery power (B+) |
| 8 | Accelerator Position Sensor (APS) #1 ground |
| 9 | Manifold Air Temperature Sensor (MAPS) ground |
| 10 | Boost Pressure Sensor (BPS) ground |
| 11 | - |
| 12 | Electric Waste Gate Actuator (EWGA) ground |
| 13 | - |
| 14 | - |
| 15 | - |
| 16 | Engine Coolant Temperature Sensor (ECTS) ground |
| 17 | - |
| 18 | - |
| 19 | - |
| 20 | A/C compressor relay control output |
| 21 | - |
| 22 | CVVT Oil Control Valve (OCV) [Bank 1/Intake] control output |
| 23 | - |
| 24 | Cooling fan PWM control output |
| 25 | - |
| 26 | - |
| 27 | Fuel pump relay control output (With Immobilizer/Smart key) |
| 28 | - |
| 29 | Ignition switch signal input |
| 30 | Accelerator Position Sensor (APS) #2 ground |
| 31 | - |
| 32 | - |
| 33 | Battery sensor ground |
| 34 | - |
| 35 | - |
| 36 | Rail Pressure Sensor (RPS) ground |
| 37 | - |
| 38 | - |
| 39 | - |
| 40 | - |
| 41 | Start relay [Low] control output |
| 42 | - |
| 43 | Accelerator Position Sensor (APS) #2 power (+5V) |
| 44 | Camshaft Position Sensor (CMPS) power (+5V) |
| 45 | - |
| 46 | ISG OFF lamp signal output |
| 47 | - |
| 48 | - |
| 49 | - |
| 50 | CVVT Oil Control Valve (OCV) [Bank 1/Exhaust] control output |
| 51 | Main relay control output |
| 52 | Throttle Position Sensor (TPS) ground |
| 53 | Blower Switch MAX. signal input |
| 54 | - |
| 55 | - |
| 56 | Intake Temperature Sensor (IATS) signal input |
| 57 | Manifold Absolute Pressure Sensor (MAPS) signal input |
| 58 | Knock Sensor (KS) ground |
| 59 | VS+ (NERNST Cell Voltage) |
| 60 | Rc (Compensative Resistance) |
| 61 | LIN communication signal input |
| 62 | - |
| 63 | C-CAN [Low] |
| 64 | Batter sensor power (+5V) |
| 65 | Crankshaft Position Sensor (CKPS) power (+5V) |
| 66 | Accelerator Position Sensor (APS) #1 power (+5V) |
| 67 | Start relay [High] control output |
| 68 | RCV control solenoid valve control output |
| 69 | - |
| 70 | - |
| 71 | Fuel pump relay control output (W/O Immobilizer/Smart key) |
| 72 | - |
| 73 | - |
| 74 | Throttle Position Sensor (TPS) 2 signal input |
| 75 | - |
| 76 | Fuel Level Sensor (FLS) signal input |
| 77 | Accelerator Position Sensor (APS) 2 signal input |
| 78 | Rail Pressure Sensor (RPS) signal input |
| 79 | Knock Sensor (KS) signal input |
| 80 | VS-/IP- (Common Ground for VS, IP) |
| 81 | Rc/Rp (Pump Cell Voltage) |
| 82 | Engine speed signal output |
| 83 | Immobilizer communication line |
| 84 | - |
| 85 | C-CAN [High] |
| 86 | Manifold Absolute Pressure Sensor (MAPS) power (+5V) |
| Electric Waste Gate Actuator (EWGA) power (+5V) | |
| 87 | Boost Pressure Sensor (BPS) power (+5V) |
| Rail Pressure Sensor (RPS) power (+5V) | |
| 88 | ETC Module power (+5V) |
| 89 | Heated Oxygen Sensor (HO2S) [Bank 1/Sensor 1] Heater control output |
| 90 | - |
| 91 | Heated Oxygen Sensor (HO2S) [Bank 1/Sensor 2] Heater control output |
| 92 | - |
| 93 | - |
| 94 | Purge Control Solenoid Valve (PCSV) control output |
Repair procedures
| Removal |
| 1. | Turn ignition switch OFF and disconnect the battery negative (-) terminal. |
| 2. | Remove the battery.
(Refer to "Engine Electrical System" - Battery")
|
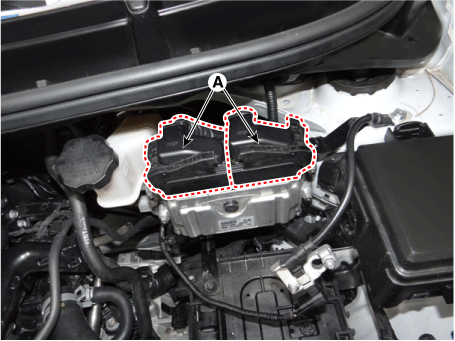
| 3. | Disconnect the ECM connectors (A).
|
| 4. | Remove the mounting bolts and nut, and then remove the ECM bracket assembly (A).
|
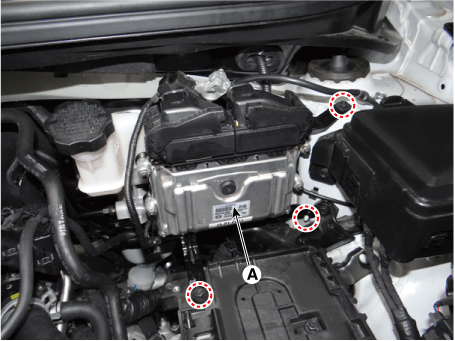
| 5. | Remove the ECM after loosening the mounting nuts (A) from the bracket.
|


| Installation |
| 1. | Install in the reverse order of removal. |
| ECM Problem Inspection Procedure |
| 1. | TEST
ECM GROUND CIRCUIT: Measure resistance between ECM and chassis ground
using the backside of ECM harness connector as ECM side check point.
Repair any problem found.
|
| 2. | TEST
ECM CONNECTOR: Disconnect the ECM connector and visually check the
ground terminals on ECM side and harness side for bent pins or poor
contact pressure. Repair any problem found. |
| 3. | If
problem could not be found in Steps 1 and 2, the ECM could be faulty.
If so, make sure there is no DTC before replacing the ECM with a new
one, and then check the vehicle again. If DTC is found, examine this
first before replacing ECM. |
| 4. | RE-TEST
THE ORIGINAL ECM: Install the original ECM (may be broken) into a
known-good vehicle and check the vehicle. If the problem recurs, replace
the original ECM with a new one. If the problem does not recur, this is
an intermittent problem. (Refer to "Intermittent Problem Inspection
Procedure" in Basic Inspection Procedure.) |
| Adjustment |
| ECM Neutral Mode procedure |
| • | After replacing the ECM of the vehicle by using the immobilizer, the following procedure must be performed. |
[If installing a used ECM] |
| 1) | Perform "ECM Neutral Mode" procedure using KDS.
(Refer to "Body Electrical System - "Immobilizer System - Repair procedures")
|
| 2) | After finishing "ECM Neutral Mode", perform "Key Teaching" procedure using KDS.
(Refer to "Body Electrical System - "Immobilizer System - Repair procedures")
|
[If installing a new ECM] Perform "Key Teaching" procedure using KDS.
(Refer to "Body Electrical System - "Immobilizer System - Repair procedures")
|
| • | After replacing the ECM of the vehicle by using the smart key system (button start), the following procedure must be performed. |
[If installing a used ECM] |
| 1) | Perform "ECM Neutral Mode" procedure using KDS.
(Refer to "Body Electrical System - "Smart key - Repair procedures")
|
| 2) | After
finishing "ECM Neutral Mode", turn IGN ON then OFF using the smart key
or start button. Then the ECM learns information on the smart key
automatically. |
[If installing a new ECM] Turn IGN ON then OFF using the smart key or start button. Then the ECM learns information on the smart key automatically. |
ETC module learning procedure
| • | Perform ETC module learning after replacing the ETC module.
(Refer to Electronic Throttle Control System - "Adjustment")
|
 Engine Control System
Components and components location
Components Location
1. ECM (Engine Control Module) 2. Manifold Absolute Pressure Sensor (MAPS) 3. Intake Air Temperature Sensor (IATS) 4. Boost Pressure Se ...
 ETC (Electronic Throttle Control) System
Specifications
Specification
Sensor
Item
Opening Percentage (%)
Output Voltage (V) [Vref = 5V]
...
Other information:
Kia Picanto JA 2017-2025 Service & Repair Manual: Tailgate Assembly
Components and components location Component Location 1. Tailgate assembly Repair procedures Replacement Wear gloves to protect hands from injury. Work in a group of two when removing and installing the tailgate. 1.Rem ...
Kia Picanto JA 2017-2025 Owner's Manual: Air bag - supplemental restraint system
1. Driver’s front air bag* 2. Passenger’s front air bag* 3. Side air bag* 4. Curtain air bag* 5. Driver’s knee air bag* 6. Front passenger’s air bag ON/OFF switch* WARNING Even in vehicles with air bags, you and your passengers must always wear the safety belts provi ...
Copyright © www.kpicanto.com 2017-2025
