Kia Picanto: Body Electrical System / Auto Lighting Control System
Kia Picanto JA 2017-2025 Service & Repair Manual / Body Electrical System / Auto Lighting Control System
Specifications
| Specifications |
|
Items
|
Specifications
| |
| Rated voltage | 5V | |
| Load | Max. 1mA (Relay load) | |
| Illuminations (LUX) | 50 | 1.22 ± 0.27 V |
| 150 | 3.23 ± 0.71 V | |
Components and components location
| Component Location |
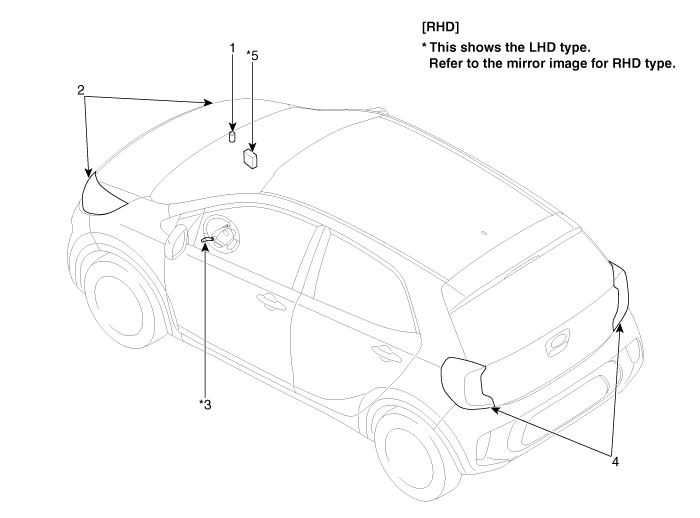
| 1. Auto light sensor 2. Headlamps 3. Lighting switch (Auto) | 4. Tail lamps 5. Body Control Module (BCM) |
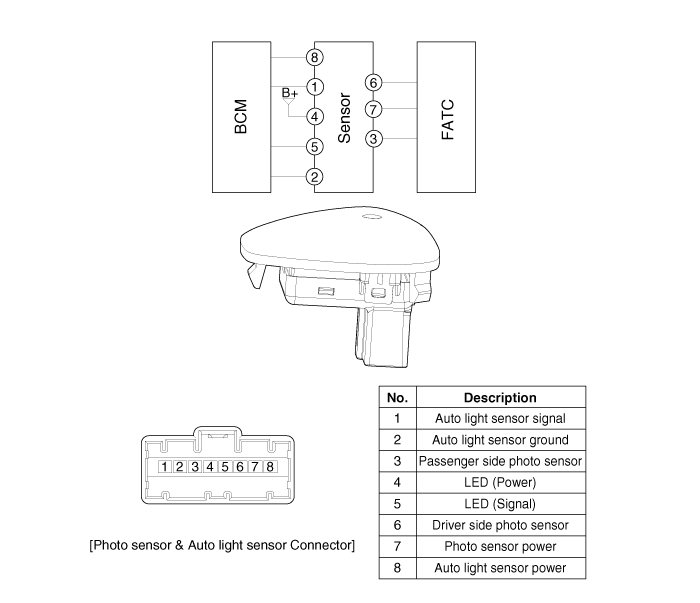
Schematic diagrams
| Circuit Diagram |
Description and operation
| Description |
It's
a system that uses illumination sensor to automatically turn ON the
tail lamp and head lamp based on the change in surrounding environment's
illumination condition. It activates when the vehicle enters/exits
tunnel, or when the illumination condition in surrounding environment
changes due to rain, snow, or fog. Precautions corresponding to the use
of this system are as follows.
| 1. | Do not add another device on top of this device. |
| 2. | Be sure to switch to manual during poor visibility climate, such as fog, heavy rain, or cloudy weather. |
| 3. | Illumination
intensity in an actual vehicle is not always constant, and lamp ON/OFF
time may very depending on the climate, season, and surrounding
environment. |
| 4. | Use this system only during sunrise and sunset period, and manually control lamp ON/OFF for general conditions. |
| 5. | Error may occur if light block coating that may change interior illumination is applied. |
 Multimedia Jack
Schematic diagrams
Circuit Diagram
Description and operation
Description
The
multimedia jack on the console upper cover is for customers who like to
listen to external portab ...
 Auto Light Sensor
Repair procedures
Inspection
Check
if the auto light control operates like a timing chart shown below.
Tail lamp output and head lamp (Low) output is controlled based on the
auto light sen ...
Other information:
Kia Picanto JA 2017-2025 Owner's Manual: Rearview camera
The rearview camera will activate when the back-up light is ON with the ignition switch ON and the shift lever in the R (Reverse) position. This system is a supplemental system that shows behind the vehicle through the navigation display while backingup. WARNING This system is a su ...
Kia Picanto JA 2017-2025 Owner's Manual: Light bulb position (Rear)
1. Rear turn signal lamp (Bulb type) 2. Tail lamp (BULB type) 3. Stop and tail lamp (BULB type) 4. Tail lamp (LED type) 5. Stop and tail lamp (LED type) 1. Back up lamp (Bulb type) 2. Rear fog lamp (BULB type) ...
Copyright © www.kpicanto.com 2017-2025
