Kia Picanto: Engine Control System / Purge Control Solenoid Valve (PCSV)
Specifications
Item
|
Specification
|
Coil Resistance (Ω)
| 18.5 - 22.5 [23°C(73.4°F)]
|
Pin
| 2
|
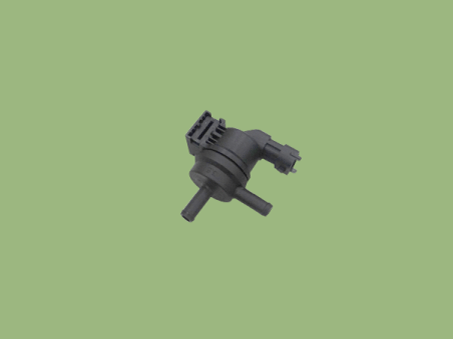
Description and operation
Installed
on the surge tank, the Purge Control Solenoid Valve (PCSV) controls the
passage between the canister and the intake manifold. This solenoid
valve is open when the ECM grounds the valve control line. When the
passage is open (PCSV ON), fuel vapor stored in the canister is
transferred to the intake manifold.
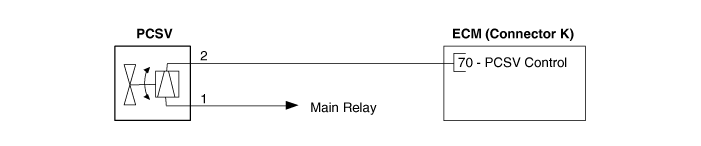
Schematic diagrams

Repair procedures
| 1. | Turn the ignition switch OFF. |
| 2. | Disconnect the PCSV connector. |
| 3. | Measure resistance between the PCSV terminals 1 and 2. |
| 4. | Check that the resistance is within the specification.
Specification: 18.5 - 22.5 [23°C(73.4°F)] |
|
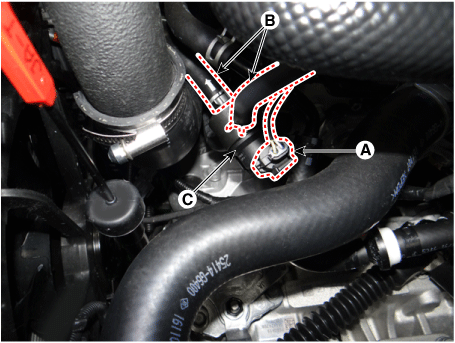
| 1. | Turn the ignition switch OFF and disconnect the battery negative (-) terminal. |
| 2. | Remove the air cleaner.
(Refer to Engine Mechanical System - "Air Cleaner")
|
| 3. | Disconnect the purge control solenoid valve connector (A). |
| 4. | Disconnect the vapor hoses (B) from the purge control solenoid valve. |
| 5. | Remove the PCSV (C) by loosening the mounting bolt.
Purge control solenoid valve bracket mounting bolt:
9.8 - 11.8 N·m (1.0 - 1.2 kgf·m, 7.2 - 8.7 lb·ft) |
 |
| •
| Install the component to the specified torques. |
| •
| Note that internal damage may occur when the component is dropped. If the component has been dropped, inspect before installing. |
| •
| Keep foreign materials away from the valve. |
|
| 1. | Install in the reverse order of removal. |
Specifications
Specification
Item
Specification
Coil Resistance (Ω) 1.43 - 1.57 (23°C) Fuel Pressure bar 200 - 267 M ...
Specifications
Specification
Item
Specification
Coil Resistance (Ω) 6.9 - 7.9 [20°C(68°F)] Control Current (mA) 100 ...
Other information:
The SRS is virtually maintenance-free
and so there are no parts you can safely
service by yourself. If the SRS air bag
warning light does not illuminate, or
continuously remains on, have the system
inspected by a professional workshop.
Kia recommends to visit an authorized
Kia dealer/se ...
Components and components location
Component Location
1. Blower Unit
Components
1. Intake Actuator 2. Intake Case [Lower] 3. Air Filter 4. FET 5. Resister 6. Intake Seal 7. Intake Case [Upper] 8. Intake Door Assembly 9. Anti Noise Pad 10. Air Filter Cover 11. Blower Case [Upper] 12. ...

 Injector
 CVVT Oil Control Valve (OCV)