Kia Picanto: Manual climate control system / Climate control air filter
Kia Picanto JA 2017-2025 Owner's Manual / Features of your vehicle / Manual climate control system / Climate control air filter
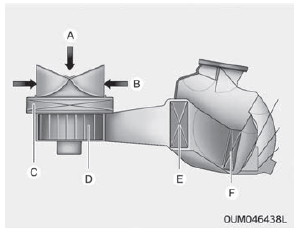
A : Outside air
B : Recirculated air
C : Climate control air filter
D : Blower
E : Evaporator core
F : Heater core
The climate control air filter installed behind the glove box filters the dust or other pollutants that come into the vehicle from the outside through the heating and air conditioning system.
If dust or other pollutants accumulate in the filter over a period of time, the air flow from the air vents may decrease, resulting in moisture accumulation on the inside of the windshield even when the outside (fresh) air position is selected. If this happens, have the climate control air filter replaced by a professional workshop. Kia recommends to visit an authorized Kia dealer/ service partner.
NOTICE
- Replace the filter according to the Maintenance Schedule. If the vehicle is being driven in severe conditions such as dusty or rough roads, more frequent air conditioner filter inspections and changes are required.
- When the air flow rate suddenly decreases, have the system checked by a professional workshop. Kia recommends to visit an authorized Kia dealer/service partner.
 System operation
Ventilation
1. Set the mode to the position.
2. Set the air intake control to the
outside (fresh) air position.
3. Set the temperature control to the
desired position.
4. Set the fan speed co ...
 Air Conditioning refrigerant label
Each symbols and specification on air
conditioning refrigerant label means as
below ;
1. Classification of refrigerant
2. Amount of refrigerant
3. Classification of Compressor lubricant
You ...
Other information:
Kia Picanto JA 2017-2025 Service & Repair Manual: Cooling System
Components and components location Components 1. Reservoir tank 2. Reservoir hose & pipe 3. Turbo charger water drain hose 4. Water return hose 5. Radiator upper mounting bracket 6. Radiator upper hose 7. Radiator lower hose 8. Radiator 9. Cooling fan assembly 10. Radiator lower mounti ...
Kia Picanto JA 2017-2025 Service & Repair Manual: Fuel Filter
Repair procedures Removal 1.Remove the fuel pump. (Refer to Fuel Delivery System - "Fuel Pump") 2.Disconnect the fuel pump motor connector (A) and fuel sender connector (B). 3.Disconnect the fuel feed tube quick-connector (A) after removing the fixing clip (B). 4.Rem ...
Copyright © www.kpicanto.com 2017-2025
