Kia Picanto (JA): Cooling System / Radiator
Components and components location
| Components |
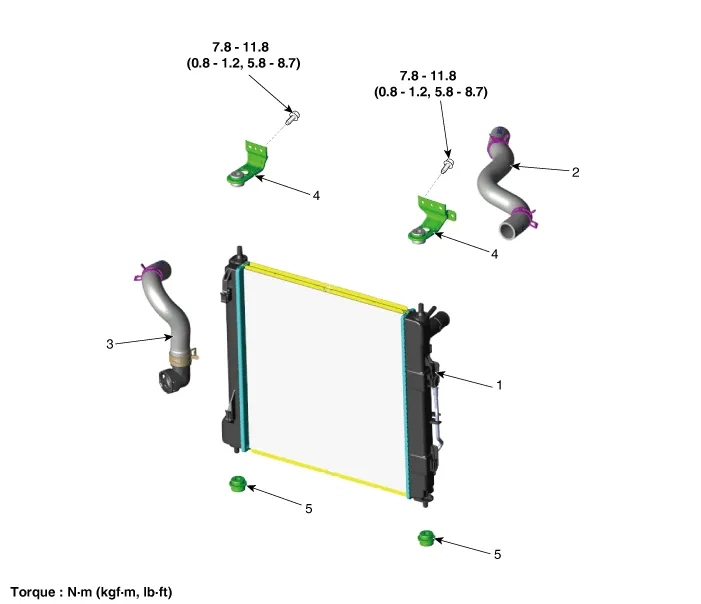
| 1. Radiator 2. Radiator upper hose 3. Radiator lower hose | 4. Radiator upper mounting bracket 5. Radiator lower mounting insulator |
Repair procedures
| Removal and Installation |
| 1. | Disconnect the battery negative terminal. |
| 2. | Remove the engine room under cover.
(Refer to Engine and Transaxle Assembly - "Engine Room Under Cover")
|
| 3. | Drain the coolant.
(Refer to Cooling System - "Coolant")
|
| 4. | Remove the air duct.
(Refer to Intake and Exhaust System - "Air Cleaner")
|
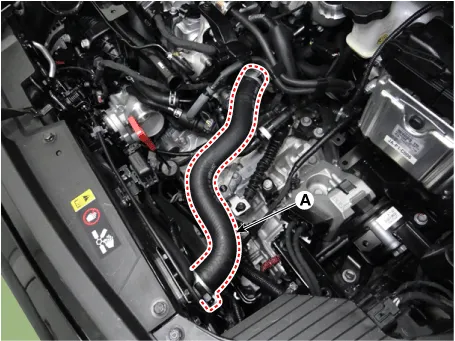
| 5. | Disconnect the radiator upper hose (A).
|
| 6. | Disconnect the radiator lower hose (A).
|

| 7. | Disconnect the cooling fan connector (A).
|

| 8. | Disconnect the ATF cooler hose (A).
|

| 9. | Remover the front bumper assembly.
(Refer to Body (Interior and Exterior) - "Front Bumper Assembly")
|
| 10. | Remove the headlamps.
(Refer to Body Electrical System - "Head Lamps")
|
| 11. | Disconnect the hood latch.
(Refer to Body (Interior and Exterior) - "Hood latch Assembly")
|
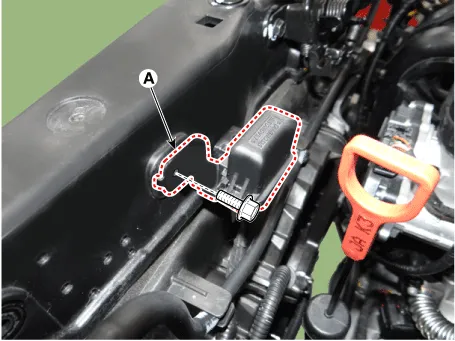
| 12. | Remove the multi-purpose check connector (MPCC) bracket (A).
|
| 13. | Disconnect the reservoir hose clip (A).
|

| 14. | Remove the radiator upper mounting bracket (A).
|

| 15. | Remove the radiator support upper member assembly (A).
|

| 16. | Disconnect the radiator reservoir hose (A).
|

| 17. | Remove the air guard (A).
[RH]
[LH]
|


| 18. | Separate the condenser and then remove the radiator (A).
|

| 19. | Remove the cooling fan assembly.
(Refer to Cooling System - "Cooling Fan")
|
| 20. | Install in the reverse order of removal. |
| 21. | Fill with engine coolant.
(Refer to Cooling System - "Coolant")
|
| 22. | Start engine and check for leaks. |
| 23. | Recheck engine coolant level. |
| Inspection |
| 1. | Install the pressure cap and pressure tester on a SST (0K253-G5100).
|
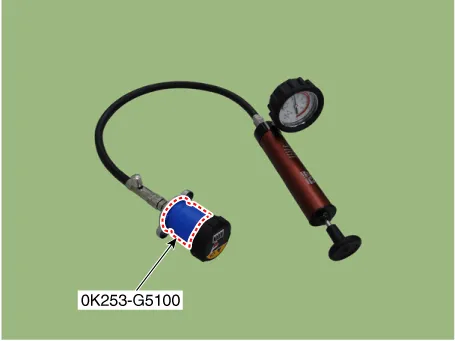
| 2. | Apply a pressure of 79.4 - 122.58 kPa (0.95 - 1.25 kgf/cm², 11.5 - 17.78 psi). |
| 3. | Check for a drop in pressure. |
| 4. | If the pressure drops, replace the pressure cap. |
| 1. | Wait
until engine is cool, then carefully remove the pressure cap and fill
the reservoir tank with engine coolant, then install it on the pressure
tester.
|

| 2. | Apply a pressure tester to the radiator and apply a pressure of 93.16 - 122.58 kPa (0.95 - 1.25 kgf/cm², 13.51 - 17.78 psi). |
| 3. | Inspect for engine coolant leaks and a drop in pressure. |
| 4. | Remove the tester and reinstall the pressure cap.
|

Components and components location Components 1. Cooling fan 3. Cooling fan motor 3. Cooling fan shroud Specifications Specifications Item Specification Fan type Puller Fan speed control ON - OFF Air flow rate [㎥/h] 1,570 - 8% min.
Repair procedures Removal and Installation 1.Disconnect the negative battery terminal. 2.Remove the engine room under cover and RH side cover. (Refer to Engine and Transaxle Assembly - “Engine Room Under Cover”) 3.
Other information:
Kia Picanto (JA) 2017-2026 Service & Repair Manual: Emergency Call System
Components and components location Components 1. Head unit (AVN, Audio) 2. Emergency call system button 3. Emergency call system MIC 4. Roof antenna 5. Emergency call unit 6. Supplemental Restraint System Control Module (SRSCM) 7. Emergency call crash pad antenna 8.
Kia Picanto (JA) 2017-2026 Service & Repair Manual: Turn Signal Lamp
Repair procedures Removal Door Mirror Turn Signal Lamp 1. Disconnect the negative (-) battery terminal. 2. Remove the mirror (A) from the mirror holder. Be careful not to damage the fixing clips (A). 3. Disconnect the heating connectors (A) from the mirror.
Categories
- Manuals Home
- Kia Picanto Owners Manual
- Kia Picanto Service Manual
- General Information
- Brake System
- Immobilizer System
- New on site
- Most important about car
